

Surachart Opun
This page contains my experiences and my thoughts about Information Technology and something new what I learned in my life.
Updated: 34 min 47 sec ago
How to create signed url on google cloud storage?
A signed URL is a URL that provides limited permission and time to make a request. It's good to be used by someone who does not have a Google Account. I caught up reading on Google Cloud documents and finding how to do it. Assume I would like to share file on google cloud storage to my friend who does have a Google Account. Example: gs://mysurachartbucket/test.txt
[student@centos~]$ gsutil mb gs://mysurachartbucket
Creating gs://mysurachartbucket/...
[student@centos~]$ cat test.txt
TEST
[student@centos~]$ gsutil cp test.txt gs://mysurachartbucket/
Copying file://test.txt [Content-Type=text/plain]...
- [1 files][ 5.0 B/ 5.0 B]
Operation completed over 1 objects/5.0 B.
[student@centos~]$ gsutil ls gs://mysurachartbucket/test.txt
gs://mysurachartbucket/test.txtFirst of all, I need keystore-file from service account. So, To create service account and key file.
[student@centos~]$ gcloud iam service-accounts list
NAME EMAIL DISABLED
Compute Engine default service account ********-compute@developer.gserviceaccount.com False
[student@centos~]$ gcloud iam service-accounts create surachart
Created service account [surachart].
[student@centos~]$ gcloud iam service-accounts list
NAME EMAIL DISABLED
Compute Engine default service account ********-compute@developer.gserviceaccount.com False
surachart@myproject.iam.gserviceaccount.com False
[student@centos~]$ gcloud iam service-accounts keys create ~/surachart.json --iam-account surachart@myproject.iam.gserviceaccount.com
created key [4d6b1bd*********08f966dd31] of type [json] as [/home/student/surachart.json] for [surachart@myproject.iam.gserviceaccount.com]Then, service account should be able to read file in bucket.
[student@centos~]$ gsutil acl ch -u surachart@myproject.iam.gserviceaccount.com:R gs://mysurachartbucket/test.txt
Updated ACL on gs://mysurachartbucket/test.txtFinally, create signed url by using gsutil command.
[student@centos~]$ gsutil signurl -d 20m surachart.json gs://mysurachartbucket/test.txt
CommandException: The signurl command requires the pyopenssl library (try pip install pyopenssl or easy_install pyopenssl)
####As error that need to install pyopenssl.
[student@centos~]$ sudo pip install pyopenssl
[student@centos~]$ gsutil signurl -d 20m surachart.json gs://mysurachartbucket/test.txt
URL HTTP Method Expiration Signed URL
gs://mysurachartbucket/test.txt GET 2020-01-27 21:34:08 https://storage.googleapis.com/mysurachartbucket/test.txt?x-goog-signature=99dbc749d2891eb1d9d22a5ccd03a81d4f0366380ff3bb0c34faf246d20677290778c6033a81fce43363709b244a882308b1c8590eaed409e1c8a0d4aca76cfec8537b1231e6b1f57************c6abaaacd128ac85f798edfb41bfa48d688897882be28cd1838520144ff197a5e84f499da914c2f8b309c32343011974a8f888163cba2a33c491fd858906bce2ad3cb5c5249c1e79127d200dccea553deafe7e1eb43a8b1527cb20e935c66129b0cad1683f01b6474a4c2940b92dd6daaa65da48fba7cbe94ed5881d46f268908735b2ad12ef2b1f7b0e79a2dd4a527cc611ea35718db96db&x-goog-algorithm=GOOG4-RSA-SHA256&x-goog-credential=surachart%40myproject.iam.gserviceaccount.com%2F20200127%2Fus%2Fstorage%2Fgoog4_request&x-goog-date=20200127T140408Z&x-goog-expires=1800&x-goog-signedheaders=hostThis signed url will expire in 20 minutes. Then send it to my friend.
Reference:
https://cloud.google.com/storage/docs/access-control/signed-urls
https://cloud.google.com/storage/docs/gsutil/commands/signurl
Categories: DBA Blogs
Oracle Database EM 18 XE Available to Remote Clients
I found lot of posts about Oracle Database 18 XE. It's very interesting for me. I didn't blog about how to install, because it's very easy for using rpm package and document very helpful.
I was interested in Enterprise Manager Database Express 18.4.0.0.0. How it looks like?
- Installing. I used CentOS7.
[student@centos-learning ~]$ sudo yum -y localinstall oracle-database*18c*
[student@centos-learning ~]$ sudo rpm -qa |grep oracle
oracle-database-preinstall-18c-1.0-1.el7.x86_64
oracle-database-xe-18c-1.0-1.x86_64
[student@centos-learning ~]$ sudo /etc/init.d/oracle-xe-18c configure
Specify a password to be used for database accounts. Oracle recommends that the password entered should be at least 8 characters in length, contain at least 1 uppercase character, 1 lower case character and 1 digit [0-9]. Note that the same password will be used for SYS, SYSTEM and PDBADMIN accounts:
The password you entered contains invalid characters. Enter password:
Confirm the password:
Configuring Oracle Listener.
Listener configuration succeeded.
Configuring Oracle Database XE.
Enter SYS user password:
*********
Enter SYSTEM user password:
********
Enter PDBADMIN User Password:
*********
Prepare for db operation
7% complete
Copying database files
29% complete
Creating and starting Oracle instance
30% complete
31% complete
34% complete
38% complete
41% complete
43% complete
Completing Database Creation
47% complete
50% complete
Creating Pluggable Databases
54% complete
71% complete
Executing Post Configuration Actions
93% complete
Running Custom Scripts
100% complete
Database creation complete. For details check the logfiles at:
/opt/oracle/cfgtoollogs/dbca/XE.
Database Information:
Global Database Name:XE
System Identifier(SID):XE
Look at the log file "/opt/oracle/cfgtoollogs/dbca/XE/XE.log" for further details.
Connect to Oracle Database using one of the connect strings:
Pluggable database: centos-learning.surachartopun.com/XEPDB1
Multitenant container database: centos-learning.surachartopun.com
Use https://localhost:5500/em to access Oracle Enterprise Manager for Oracle Database XE
[student@centos-learning ~]$ netstat -ltn |grep 5500
tcp 0 0 127.0.0.1:5500 0.0.0.0:* LISTEN
- Checked alert log file and fixed.
Error: Global ports off in Root, do SetGlobalPortEnabled(TRUE) to enable.
bash-4.2$ tail -f alert_XE.log
2018-10-22T22:06:32.890217+07:00
Global ports off in Root, do SetGlobalPortEnabled(TRUE) to enable.
2018-10-22T22:06:38.489011+07:00
Global ports off in Root, do SetGlobalPortEnabled(TRUE) to enable.
2018-10-22T22:10:32.402822+07:00
Resize operation completed for file# 3, old size 501760K, new size 512000K
2018-10-22T22:15:55.791490+07:00
Global ports off in Root, do SetGlobalPortEnabled(TRUE) to enable.
2018-10-22T22:18:02.248906+07:00
Global ports off in Root, do SetGlobalPortEnabled(TRUE) to enable.Setting the Global Port for EM Express to Manage a CDB and the PDBs. (It might not be the right solution, but I just wanted to see EM).
SQL> select dbms_xdb_config.getHttpsPort() from dual;
DBMS_XDB_CONFIG.GETHTTPSPORT()
------------------------------
5500
SQL> exec dbms_xdb_config.SetGlobalPortEnabled(TRUE)
PL/SQL procedure successfully completed.- Login again.


It worked fine for now.
Reference: Installation Guide for Linux x86-64
I was interested in Enterprise Manager Database Express 18.4.0.0.0. How it looks like?
- Installing. I used CentOS7.
[student@centos-learning ~]$ sudo yum -y localinstall oracle-database*18c*
[student@centos-learning ~]$ sudo rpm -qa |grep oracle
oracle-database-preinstall-18c-1.0-1.el7.x86_64
oracle-database-xe-18c-1.0-1.x86_64
[student@centos-learning ~]$ sudo /etc/init.d/oracle-xe-18c configure
Specify a password to be used for database accounts. Oracle recommends that the password entered should be at least 8 characters in length, contain at least 1 uppercase character, 1 lower case character and 1 digit [0-9]. Note that the same password will be used for SYS, SYSTEM and PDBADMIN accounts:
The password you entered contains invalid characters. Enter password:
Confirm the password:
Configuring Oracle Listener.
Listener configuration succeeded.
Configuring Oracle Database XE.
Enter SYS user password:
*********
Enter SYSTEM user password:
********
Enter PDBADMIN User Password:
*********
Prepare for db operation
7% complete
Copying database files
29% complete
Creating and starting Oracle instance
30% complete
31% complete
34% complete
38% complete
41% complete
43% complete
Completing Database Creation
47% complete
50% complete
Creating Pluggable Databases
54% complete
71% complete
Executing Post Configuration Actions
93% complete
Running Custom Scripts
100% complete
Database creation complete. For details check the logfiles at:
/opt/oracle/cfgtoollogs/dbca/XE.
Database Information:
Global Database Name:XE
System Identifier(SID):XE
Look at the log file "/opt/oracle/cfgtoollogs/dbca/XE/XE.log" for further details.
Connect to Oracle Database using one of the connect strings:
Pluggable database: centos-learning.surachartopun.com/XEPDB1
Multitenant container database: centos-learning.surachartopun.com
Use https://localhost:5500/em to access Oracle Enterprise Manager for Oracle Database XE
[student@centos-learning ~]$ netstat -ltn |grep 5500
tcp 0 0 127.0.0.1:5500 0.0.0.0:* LISTEN
- As I didn't want to connect 127.0.0.1, I changed binding - "Making Oracle Database EM Express Available to Remote Clients"
SQL> !netstat -ltn |grep 5500
tcp 0 0 127.0.0.1:5500 0.0.0.0:* LISTEN
SQL> !lsnrctl status | grep HTTP
(DESCRIPTION=(ADDRESS=(PROTOCOL=tcps)(HOST=127.0.0.1)(PORT=5500))(Security=(my_wallet_directory=/opt/oracle/product/18c/dbhomeXE/admin/XE/xdb_wallet))(Presentation=HTTP)(Session=RAW))
SQL>
SQL>
SQL> EXEC DBMS_XDB.SETLISTENERLOCALACCESS(FALSE);
PL/SQL procedure successfully completed.
SQL> !netstat -ltn |grep 5500
tcp 0 0 0.0.0.0:5500 0.0.0.0:* LISTEN
SQL> !lsnrctl status | grep HTTP
(DESCRIPTION=(ADDRESS=(PROTOCOL=tcps)(HOST=centos-learning.surachartopun.com)(PORT=5500))(Security=(my_wallet_directory=/opt/oracle/admin/XE/xdb_wallet))(Presentation=HTTP)(Session=RAW))
SQL> !netstat -ltn |grep 5500
tcp 0 0 127.0.0.1:5500 0.0.0.0:* LISTEN
SQL> !lsnrctl status | grep HTTP
(DESCRIPTION=(ADDRESS=(PROTOCOL=tcps)(HOST=127.0.0.1)(PORT=5500))(Security=(my_wallet_directory=/opt/oracle/product/18c/dbhomeXE/admin/XE/xdb_wallet))(Presentation=HTTP)(Session=RAW))
SQL>
SQL>
SQL> EXEC DBMS_XDB.SETLISTENERLOCALACCESS(FALSE);
PL/SQL procedure successfully completed.
SQL> !netstat -ltn |grep 5500
tcp 0 0 0.0.0.0:5500 0.0.0.0:* LISTEN
SQL> !lsnrctl status | grep HTTP
(DESCRIPTION=(ADDRESS=(PROTOCOL=tcps)(HOST=centos-learning.surachartopun.com)(PORT=5500))(Security=(my_wallet_directory=/opt/oracle/admin/XE/xdb_wallet))(Presentation=HTTP)(Session=RAW))
- Browsed it - https://IP:5500/em

However, I got some error like "Connection with database failed. Database instance might be down."

Error: Global ports off in Root, do SetGlobalPortEnabled(TRUE) to enable.
bash-4.2$ tail -f alert_XE.log
2018-10-22T22:06:32.890217+07:00
Global ports off in Root, do SetGlobalPortEnabled(TRUE) to enable.
2018-10-22T22:06:38.489011+07:00
Global ports off in Root, do SetGlobalPortEnabled(TRUE) to enable.
2018-10-22T22:10:32.402822+07:00
Resize operation completed for file# 3, old size 501760K, new size 512000K
2018-10-22T22:15:55.791490+07:00
Global ports off in Root, do SetGlobalPortEnabled(TRUE) to enable.
2018-10-22T22:18:02.248906+07:00
Global ports off in Root, do SetGlobalPortEnabled(TRUE) to enable.Setting the Global Port for EM Express to Manage a CDB and the PDBs. (It might not be the right solution, but I just wanted to see EM).
SQL> select dbms_xdb_config.getHttpsPort() from dual;
DBMS_XDB_CONFIG.GETHTTPSPORT()
------------------------------
5500
SQL> exec dbms_xdb_config.SetGlobalPortEnabled(TRUE)
PL/SQL procedure successfully completed.- Login again.


It worked fine for now.
Reference: Installation Guide for Linux x86-64
Categories: DBA Blogs
How to allow private connectivity across organizations(GCP)?
It's interesting, when you would like to allow private connectivity across two VPC networks that they belong to the different project/organization on Google Cloud Platform (GCP).
As google document that we can use VPC Network Peering? VPC Network Peering is a decentralized or distributed approach to multi-project networking. Additional, it works with Compute Engine, Kubernetes Engine,and App Engine flexible environments.
I did a lab about Virtual Private Cloud (VPC) Network Peering. There shows to do VPC Network Peering between VPC networks in the same project. So, I would like to see how it works on across organizations.
Example: On My Organization (my project), I would like to connect server (Private IP Address) on another Organization (another project).
As a subnet CIDR prefix in one peered VPC network cannot overlap with a subnet CIDR prefix in another peered network. So, both VPC networks must have the different CIDR prefix.
My Organization [myproject] {ubuntu-test, default/10.146.0.2} <======> No organization [qwiklabs-gcp***]{privatenet-us-vm/172.16.0.2}
On No organization [qwiklabs-gcp***]: VPC network name is "privatenet".

VPC:
Firewall:

My Organization [myproject]: I used "default" VPC and default firewall.
Then, starting to create "VPC Network Peering".
- To create "VPC Network Peering" on myproject: Networking => "VPC network" => "VPC network peering".
Click "Create Peering Connection". name = "peering-to-lab".
Note: you must know Project ID and VPC network name for network destination.

It should show "Waiting for peer network to connect".
- To create "VPC Network Peering" on another Project: On No organization [qwiklabs-gcp***], "Create Peering Connection". name = "peering-to-mygcp".

 On myproject:

- Finally, test connection: ssh to my vm and test (ssh) connection to {privatenet-us-vm/172.16.0.2}.
Note: (as firewall allow icmp/ssh). No need to do on firewall.

opun@ubuntu-test:~$ ssh 172.16.0.2
opun@172.16.0.2's password:
Linux privatenet-us-vm 4.9.0-8-amd64 #1 SMP Debian 4.9.110-3+deb9u4 (2018-08-21) x86_64
The programs included with the Debian GNU/Linux system are free software;
the exact distribution terms for each program are described in the
individual files in /usr/share/doc/*/copyright.
Debian GNU/Linux comes with ABSOLUTELY NO WARRANTY, to the extent
permitted by applicable law.
Last login: Wed Sep 19 06:22:05 2018 from 10.146.0.2
Could not chdir to home directory /home/opun: No such file or directory
$ w
06:22:55 up 43 min, 2 users, load average: 0.00, 0.00, 0.00
USER TTY FROM LOGIN@ IDLE JCPU PCPU WHAT
opun pts/1 10.146.0.2 06:22 1.00s 0.00s 0.00s w ************Reference: https://cloud.google.com/vpc/docs/vpc-peering
As google document that we can use VPC Network Peering? VPC Network Peering is a decentralized or distributed approach to multi-project networking. Additional, it works with Compute Engine, Kubernetes Engine,and App Engine flexible environments.
I did a lab about Virtual Private Cloud (VPC) Network Peering. There shows to do VPC Network Peering between VPC networks in the same project. So, I would like to see how it works on across organizations.
Example: On My Organization (my project), I would like to connect server (Private IP Address) on another Organization (another project).
As a subnet CIDR prefix in one peered VPC network cannot overlap with a subnet CIDR prefix in another peered network. So, both VPC networks must have the different CIDR prefix.
My Organization [myproject] {ubuntu-test, default/10.146.0.2} <======> No organization [qwiklabs-gcp***]{privatenet-us-vm/172.16.0.2}
On No organization [qwiklabs-gcp***]: VPC network name is "privatenet".
VPC:
Firewall:
My Organization [myproject]: I used "default" VPC and default firewall.

Then, starting to create "VPC Network Peering".
- To create "VPC Network Peering" on myproject: Networking => "VPC network" => "VPC network peering".
Click "Create Peering Connection". name = "peering-to-lab".
Note: you must know Project ID and VPC network name for network destination.

It should show "Waiting for peer network to connect".
- To create "VPC Network Peering" on another Project: On No organization [qwiklabs-gcp***], "Create Peering Connection". name = "peering-to-mygcp".
After clicking "Create". It should show "Connected" on both projects (if configuration corrects) like.
- Finally, test connection: ssh to my vm and test (ssh) connection to {privatenet-us-vm/172.16.0.2}.
Note: (as firewall allow icmp/ssh). No need to do on firewall.
opun@ubuntu-test:~$ ssh 172.16.0.2
opun@172.16.0.2's password:
Linux privatenet-us-vm 4.9.0-8-amd64 #1 SMP Debian 4.9.110-3+deb9u4 (2018-08-21) x86_64
The programs included with the Debian GNU/Linux system are free software;
the exact distribution terms for each program are described in the
individual files in /usr/share/doc/*/copyright.
Debian GNU/Linux comes with ABSOLUTELY NO WARRANTY, to the extent
permitted by applicable law.
Last login: Wed Sep 19 06:22:05 2018 from 10.146.0.2
Could not chdir to home directory /home/opun: No such file or directory
$ w
06:22:55 up 43 min, 2 users, load average: 0.00, 0.00, 0.00
USER TTY FROM LOGIN@ IDLE JCPU PCPU WHAT
opun pts/1 10.146.0.2 06:22 1.00s 0.00s 0.00s w ************Reference: https://cloud.google.com/vpc/docs/vpc-peering
Categories: DBA Blogs
GCP - How to manage SSH keys on VM Instance?
On Google Cloud Platform, adding SSH keys in Metadata (project-wide public SSH keys). It can help to ssh to every VM instances on Compute Engine easily but it's not a good idea. We are able to do for test, but should not use on Production. We should add SSH Key in OS login.
https://cloud.google.com/compute/docs/instances/adding-removing-ssh-keys#risks
Question: How can we block SSH Keys from Metadata(project-wide public SSH keys) on VM instance?
Answer: We can block by checking "Block project-wide SSH keys" on each instance.
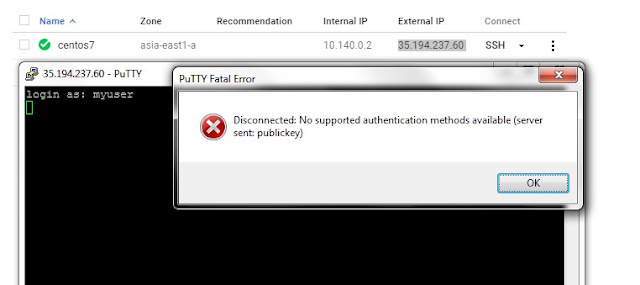
In case we have SSH Key on metadata. We are able to ssh by using private key and login like.

So, we block it... On "Compute Engine" - "VM Instances", click [instance name] and "Edit". To check "Block project-wide SSH keys" and "Save".
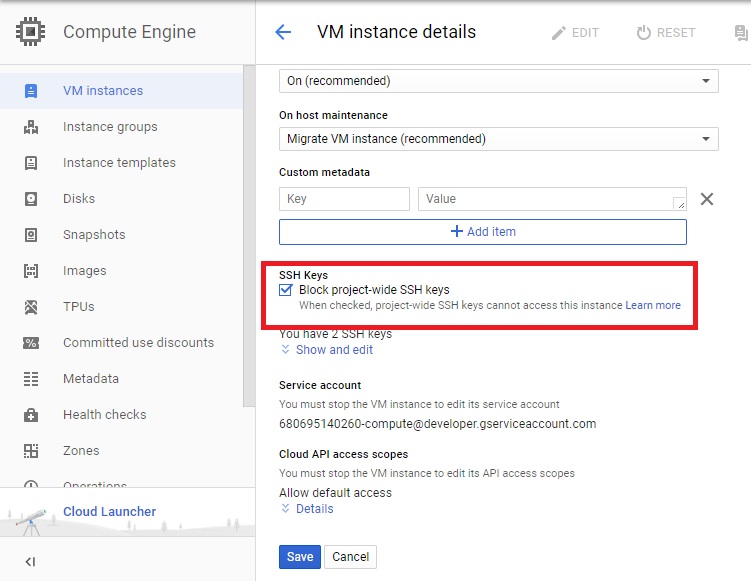
VM instance should refuse Key what 's not in SSH Keys of VM instance. (You can remove SSH Keys of project owner on instance, but it will be automatic added when you click "SSH" on GUI).

Additional, we should review and remove SSH Keys in metadata(project-wide public SSH keys), if we ensure we have not used. (Don't remove ssh key of project owner).
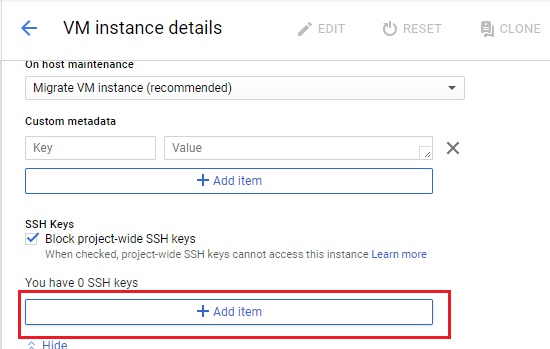
After removing, We would like to add SSH Key and don't want to add it in OS login. We are able to add it in SSH Keys on Instance like.
Assume: username is "myuser".
First of all, we have to generate Private and Public Keys. Example uses "PuTTY Key Generator". Because I use "Putty.

Then "Save private key" (We have to use when putty to server) and "Save public key".
To use public key on VM instance, click "Add item".
Example: It's [public key] [username]
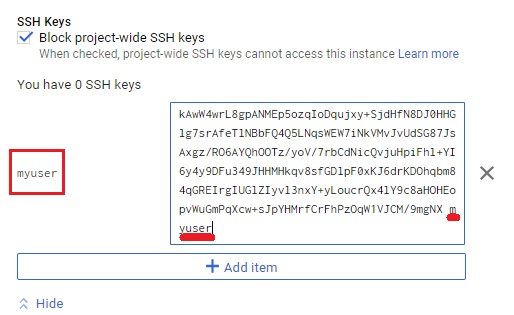
then "Save".
Note: In picture, it's highlight about [username]
Open "putty", select "Private key file for authentication", fill in ip address and connect.


Assume: username is "myuser".
First of all, we have to generate Private and Public Keys. Example uses "PuTTY Key Generator". Because I use "Putty.

Then "Save private key" (We have to use when putty to server) and "Save public key".
To use public key on VM instance, click "Add item".

Example: It's [public key] [username]

then "Save".
Note: In picture, it's highlight about [username]
Open "putty", select "Private key file for authentication", fill in ip address and connect.

it's easy, right?
myuser@centos7:~$ id
uid=1003(myuser) gid=1004(myuser) groups=1004(myuser),4(adm),30(dip),44(video),46(plugdev),1000(google-sudoers)If we use command "id [user in project-wide SSH keys], we still see it, but it's unable to ssh on this VM instance.
myuser@centos7:~$ id opun
uid=1001(opun) gid=1002(opun) groups=1002(opun),4(adm),30(dip),44(video),46(plugdev),
Reference:
Categories: DBA Blogs
Install OEM 13c Silent mode
How to install Oracle EM 13c? It's the first time that I have a chance to install Oracle EM 13c. I remember last time I installed Oracle EM 12c. I have to install weblogic first. On OEM 13c, I don't need to do something like that. It installs WLS -12.1.0.3 , JDK – 1.7.0_80.
ip_local_port_range parameter is set between 11000 to 65000
soft nofiles = 30000
file max = 65536
Database:
optimizer_adaptive_features = FALSE
In this post, I installed Oracle EM 13c Silent mode with "SMALL" deployment. I assume, I installed Oracle Database Software 12.1.0.2 (Software Only), downloaded "12.1.0.2 DB Template for EM 13.1.0.0 on Linux x86-64" template and uncompressed it in $ORACLE_HOME/assistants/dbca/templates folder.
OS:ip_local_port_range parameter is set between 11000 to 65000
soft nofiles = 30000
file max = 65536
Database:
optimizer_adaptive_features = FALSE
Then, created database by using template.
[oracle@em13c ~]$ diff /u01/app/oracle/product/12.1.0/dbhome_1/assistants/dbca/dbca.rsp dbca-emrep.rsp
78c78
< GDBNAME = "orcl12c.us.oracle.com"
---
> GDBNAME = "emrep"
205c205
< SID = "orcl12c"
---
> SID = "emrep"
265c265
< TEMPLATENAME = "General_Purpose.dbc"
---
> TEMPLATENAME = "12.1.0.2.0_Database_Template_for_EM13_1_0_0_0_Small_deployment.dbc"
286c286
< #SYSPASSWORD = "password"
---
> SYSPASSWORD = "password1"
296c296
< #SYSTEMPASSWORD = "password"
---
> SYSTEMPASSWORD = "password1"
467c467
< #DATAFILEDESTINATION =
---
> DATAFILEDESTINATION = /u02/oradata
487c487
< #STORAGETYPE=FS
---
> STORAGETYPE=FS
525c525
< #CHARACTERSET = "US7ASCII"
---
> CHARACTERSET = "AL32UTF8"
[oracle@em13c ~]$ export ORACLE_HOME=/u01/app/oracle/product/12.1.0/dbhome_1
[oracle@em13c ~]$ export ORACLE_BASE=/u01/app/oracle
[oracle@em13c ~]$ /u01/app/oracle/product/12.1.0/dbhome_1/bin/dbca -silent -responseFile dbca-emrep.rsp
Copying database files
1% complete
3% complete
10% complete
16% complete
23% complete
30% complete
33% complete
Creating and starting Oracle instance
35% complete
40% complete
44% complete
49% complete
50% complete
53% complete
55% complete
Completing Database Creation
58% complete
62% complete
65% complete
75% complete
85% complete
88% complete
Running Custom Scripts
100% complete
Look at the log file "/u01/app/oracle/cfgtoollogs/dbca/emrep/emrep.log" for further details.
Checked database after installing.
[oracle@em13c ~]$ . oraenv
ORACLE_SID = [oracle] ? emrep
The Oracle base remains unchanged with value /u01/app/oracle
[oracle@em13c ~]$ sqlplus / as sysdba
SQL*Plus: Release 12.1.0.2.0 Production on Wed Sep 14 14:39:32 2016
Copyright (c) 1982, 2014, Oracle. All rights reserved.
Connected to:
Oracle Database 12c Enterprise Edition Release 12.1.0.2.0 - 64bit Production
With the Partitioning, OLAP, Advanced Analytics and Real Application Testing options
SQL> select instance_name from v$instance;
INSTANCE_NAME
----------------
emrep
SQL> select name from v$datafile;
NAME
------------------------------------------------------------------------------------------------------------------------------------------------------
/u02/oradata/emrep/system01.dbf
/u02/oradata/emrep/sysaux01.dbf
/u02/oradata/emrep/undotbs01.dbf
/u02/oradata/emrep/users01.dbf
/u02/oradata/emrep/mgmt_depot.dbf
/u02/oradata/emrep/mgmt.dbf
/u02/oradata/emrep/mgmt_ad4j.dbf
7 rows selected.
SQL> show parameter spfile
NAME TYPE VALUE
------------------------------------ ----------- ------------------------------
spfile string /u01/app/oracle/product/12.1.0
/dbhome_1/dbs/spfileemrep.ora
SQL> show parameter optimizer_adaptive_features
NAME TYPE VALUE
------------------------------------ ----------- ------------------------------
optimizer_adaptive_features boolean FALSE
SQL> archive log list
Database log mode No Archive Mode
Automatic archival Disabled
Archive destination /u01/app/oracle/product/12.1.0/dbhome_1/dbs/arch
Oldest online log sequence 1
Current log sequence 1
SQL> show parameter control_files
NAME TYPE VALUE
------------------------------------ ----------- ------------------------------
control_files string /u02/oradata/emrep/control01.c
tl, /u02/oradata/emrep/control02.ctlConfigured listener.
[oracle@em13c ~]$ diff /u01/app/oracle/product/12.1.0/dbhome_1/assistants/netca/netca.rsp /home/oracle/netca.rsp
46c46
< #SHOW_GUI=false
---
> SHOW_GUI=false
60c60
< #LOG_FILE=""/oracle12cHome/network/tools/log/netca.log""
---
> LOG_FILE=""/u01/app/oracle/product/12.1.0/dbhome_1/network/tools/log/netca.log""
113c113
< NSN_NUMBER=1
---
> #NSN_NUMBER=1
117c117
< NSN_NAMES={"EXTPROC_CONNECTION_DATA"}
---
> #NSN_NAMES={"EXTPROC_CONNECTION_DATA"}
121c121
< NSN_SERVICE={"PLSExtProc"}
---
> #NSN_SERVICE={"PLSExtProc"}
127c127
< NSN_PROTOCOLS={"TCP;HOSTNAME;1521"}
---
> #NSN_PROTOCOLS={"TCP;HOSTNAME;1521"}
[oracle@em13c ~]$ netca -silent -orahome /u01/app/oracle/product/12.1.0/dbhome_1 -responsefile /home/oracle/netca.rsp
Wed Sep 14 15:26:52 ICT 2016 Oracle Net Configuration Assistant
Parsing command line arguments:
Parameter "silent" = true
Parameter "orahome" = /u01/app/oracle/product/12.1.0/dbhome_1
Parameter "responsefile" = /home/oracle/netca.rsp
Parameter "log" = /u01/app/oracle/product/12.1.0/dbhome_1/network/tools/log/netca.log
Done parsing command line arguments.
Oracle Net Services Configuration:
Profile configuration complete.
Oracle Net Listener Startup:
Running Listener Control:
/u01/app/oracle/product/12.1.0/dbhome_1/bin/lsnrctl start LISTENER
Listener Control complete.
Listener started successfully.
Listener configuration complete.
Oracle Net Services configuration successful. The exit code is 0
[oracle@em13c ~]$ lsnrctl status
LSNRCTL for Linux: Version 12.1.0.2.0 - Production on 14-SEP-2016 15:27:35
Copyright (c) 1991, 2014, Oracle. All rights reserved.
Connecting to (DESCRIPTION=(ADDRESS=(PROTOCOL=TCP)(HOST=em13c.surachartopun.com)(PORT=1521)))
STATUS of the LISTENER
------------------------
Alias LISTENER
Version TNSLSNR for Linux: Version 12.1.0.2.0 - Production
Start Date 14-SEP-2016 15:26:52
Uptime 0 days 0 hr. 0 min. 42 sec
Trace Level off
Security ON: Local OS Authentication
SNMP OFF
Listener Parameter File /u01/app/oracle/product/12.1.0/dbhome_1/network/admin/listener.ora
Listener Log File /u01/app/oracle/diag/tnslsnr/em13c/listener/alert/log.xml
Listening Endpoints Summary...
(DESCRIPTION=(ADDRESS=(PROTOCOL=tcp)(HOST=em13c.surachartopun.com)(PORT=1521)))
(DESCRIPTION=(ADDRESS=(PROTOCOL=ipc)(KEY=EXTPROC1521)))
Services Summary...
Service "emrep" has 1 instance(s).
Instance "emrep", status READY, has 1 handler(s) for this service...
Service "emrepXDB" has 1 instance(s).
Instance "emrep", status READY, has 1 handler(s) for this service...
The command completed successfully
It was time to install Oracle EM 13c Silent mode.
- Uncompressed software and created response file.
[oracle@em13c scratch]$ ls em13100*
em13100_linux64-2.zip em13100_linux64-3.zip em13100_linux64-4.zip em13100_linux64-5.zip em13100_linux64.bin
[oracle@em13c scratch]$ ./em13100_linux64.bin -getResponseFileTemplates -outputLoc /home/oracle/RSP
0%...............................................................100%
Launcher log file is /tmp/OraInstall2016-09-14_03-31-39PM/launcher2016-09-14_03-31-39PM.log.
Copying response file template(s)
to /home/oracle/RSP ...
Copying response file template upgrade.rsp
Copying response file template software_only.rsp
Copying response file template new_install.rsp
Finished copying response file template(s)
- Modified response file and installed OEM13c. (I chose to use new install)
[oracle@em13c scratch]$ diff /home/oracle/RSP/new_install.rsp /home/oracle/RSP/my-new_install.rsp
38c38
< UNIX_GROUP_NAME=<string>
---
> UNIX_GROUP_NAME=dba
46c46
< INVENTORY_LOCATION=<string>
---
> INVENTORY_LOCATION=/u01/app/oraInventory
60c60
< DECLINE_SECURITY_UPDATES=false
---
> DECLINE_SECURITY_UPDATES=true
67c67
< MYORACLESUPPORT_USERNAME=<string>
---
> #MYORACLESUPPORT_USERNAME=<string>
74c74
< MYORACLESUPPORT_PASSWORD=<string>
---
> #MYORACLESUPPORT_PASSWORD=<string>
92c92
< STAGE_LOCATION=<string>
---
> #STAGE_LOCATION=<string>
101c101
< MYORACLESUPPORT_USERNAME_FOR_SOFTWAREUPDATES=<string>
---
> #MYORACLESUPPORT_USERNAME_FOR_SOFTWAREUPDATES=<string>
110c110
< MYORACLESUPPORT_PASSWORD_FOR_SOFTWAREUPDATES=<string>
---
> #MYORACLESUPPORT_PASSWORD_FOR_SOFTWAREUPDATES=<string>
117c117
< PROXY_USER=<string>
---
> #PROXY_USER=<string>
124c124
< PROXY_PWD=<string>
---
> #PROXY_PWD=<string>
131c131
< PROXY_HOST=<string>
---
> #PROXY_HOST=<string>
138c138
< PROXY_PORT=<string>
---
> #PROXY_PORT=<string>
145c145
< ORACLE_MIDDLEWARE_HOME_LOCATION=<string>
---
> ORACLE_MIDDLEWARE_HOME_LOCATION=/u01/app/oracle/mw13c
153c153
< ORACLE_HOSTNAME=<string>
---
> ORACLE_HOSTNAME=em13c.surachartopun.com
160c160
< AGENT_BASE_DIR=<string>
---
> AGENT_BASE_DIR=/u01/app/oracle/agent13c
167c167
< WLS_ADMIN_SERVER_USERNAME=<string>
---
> WLS_ADMIN_SERVER_USERNAME=weblogic
174c174
< WLS_ADMIN_SERVER_PASSWORD=<string>
---
> WLS_ADMIN_SERVER_PASSWORD=password1
181c181
< WLS_ADMIN_SERVER_CONFIRM_PASSWORD=<string>
---
> WLS_ADMIN_SERVER_CONFIRM_PASSWORD=password1
188c188
< NODE_MANAGER_PASSWORD=<string>
---
> NODE_MANAGER_PASSWORD=password1
195c195
< NODE_MANAGER_CONFIRM_PASSWORD=<string>
---
> NODE_MANAGER_CONFIRM_PASSWORD=password1
202c202
< ORACLE_INSTANCE_HOME_LOCATION=<string>
---
> ORACLE_INSTANCE_HOME_LOCATION=/u01/app/oracle/gc_inst
221c221
< SOFTWARE_LIBRARY_LOCATION=<string>
---
> SOFTWARE_LIBRARY_LOCATION=/u01/app/oracle/swlib
229c229
< DATABASE_HOSTNAME=<string>
---
> DATABASE_HOSTNAME=em13c.surachartopun.com
237c237
< LISTENER_PORT=<string>
---
> LISTENER_PORT=1521
245c245
< SERVICENAME_OR_SID=<string>
---
> SERVICENAME_OR_SID=emrep
253c253
< SYS_PASSWORD=<string>
---
> SYS_PASSWORD=password1
261c261
< SYSMAN_PASSWORD=<string>
---
> SYSMAN_PASSWORD=password1
268c268
< SYSMAN_CONFIRM_PASSWORD=<string>
---
> SYSMAN_CONFIRM_PASSWORD=password1
275c275
< DEPLOYMENT_SIZE=MEDIUM
---
> DEPLOYMENT_SIZE=SMALL
283c283
< MANAGEMENT_TABLESPACE_LOCATION=<string>
---
> #MANAGEMENT_TABLESPACE_LOCATION=<string>
291c291
< CONFIGURATION_DATA_TABLESPACE_LOCATION=<string>
---
> #CONFIGURATION_DATA_TABLESPACE_LOCATION=<string>
299c299
< JVM_DIAGNOSTICS_TABLESPACE_LOCATION=<string>
---
> #JVM_DIAGNOSTICS_TABLESPACE_LOCATION=<string>
306c306
< AGENT_REGISTRATION_PASSWORD=<string>
---
> AGENT_REGISTRATION_PASSWORD=password1
313c313
< AGENT_REGISTRATION_CONFIRM_PASSWORD=<string>
---
> AGENT_REGISTRATION_CONFIRM_PASSWORD=password1
320c320
< STATIC_PORTS_FILE=<string>
---
> #STATIC_PORTS_FILE=/u01/app/oracle/mw13c/install/portlist.ini
368c368
< CONFIG_LOCATION=<string>
---
> #CONFIG_LOCATION=<string>
376c376
< CLUSTER_LOCATION=<string>
---
> #CLUSTER_LOCATION=<string>Note: As I created database from template. So. I didn't set *TABLESPACE_LOCATION variables. For variables, that didn't define. we should comment it.
[oracle@em13c scratch]$ ./em13100_linux64.bin -silent -ignoreSysPrereqs -responseFile /home/oracle/RSP/my-new_install.rsp
0%...............................................................100%
Launcher log file is /tmp/OraInstall2016-09-14_05-56-59PM/launcher2016-09-14_05-56-59PM.log.
Starting Oracle Universal Installer
Checking if CPU speed is above 300 MHz. Actual 2300.094 MHz Passed
Checking swap space: must be greater than 512 MB. Actual 0 MB Failed <<<<
Checking if this platform requires a 64-bit JVM. Actual 64 Passed (64-bit not required)
Checking temp space: must be greater than 300 MB. Actual 32844 MB Passed
>>> Ignoring failure(s) of required prerequisite checks. Continuing...
Preparing to launch the Oracle Universal Installer from /tmp/OraInstall2016-09-14_05-56-59PM
====Prereq Config Location main===
/tmp/OraInstall2016-09-14_05-56-59PM/stage/prereq
EMGCInstaller args -scratchPath
EMGCInstaller args /tmp/OraInstall2016-09-14_05-56-59PM
EMGCInstaller args -sourceType
EMGCInstaller args network
EMGCInstaller args -timestamp
EMGCInstaller args 2016-09-14_05-56-59PM
EMGCInstaller args -paramFile
EMGCInstaller args /tmp/sfx_g7ViFx/Disk1/install/linux64/oraparam.ini
EMGCInstaller args -silent
EMGCInstaller args -ignoreSysPrereqs
EMGCInstaller args -responseFile
EMGCInstaller args /home/oracle/RSP/my-new_install.rsp
EMGCInstaller args -nocleanUpOnExit
DiskLoc inside SourceLoc/u02/SRC/EM13c/scratch
EMFileLoc:/tmp/OraInstall2016-09-14_05-56-59PM/oui/em/
ScratchPathValue :/tmp/OraInstall2016-09-14_05-56-59PM
EMGCInstallUpdatesInfoOnNext:: calling actionOnClickofNext
Now in EMGCInstallUpdatesInfoOnNext.actionsOnClickofNext
EMGCInstallUpdatesInfoOnNext:: End of actionOnClickofNext
Session log file is /tmp/OraInstall2016-09-14_05-56-59PM/install2016-09-14_05-56-59PM.log
.
.
.
Setup in progress (Wednesday, September 14, 2016 6:03:38 PM ICT)
Setup successful
Saving inventory (Wednesday, September 14, 2016 6:03:38 PM ICT)
Saving inventory complete
End of install phases.(Wednesday, September 14, 2016 6:03:39 PM ICT)
&Decline License Agreement/u01/app/oracle/mw13c/sysman/install/plugins/oracle.sysman.si/13.1.1.0.0/oracle.sysman.si.discovery.plugin-13.1.1.0.0.farb
Session log file is /tmp/OraInstall2016-09-14_05-56-59PM/install2016-09-14_05-56-59PM.log
........................................................................
Installation in progress (Wednesday, September 14, 2016 6:03:40 PM ICT)
72% Done.
Install successful
Linking in progress (Wednesday, September 14, 2016 6:03:40 PM ICT)
Link successful
Setup in progress (Wednesday, September 14, 2016 6:03:40 PM ICT)
Setup successful
Saving inventory (Wednesday, September 14, 2016 6:03:40 PM ICT)
Saving inventory complete
End of install phases.(Wednesday, September 14, 2016 6:03:41 PM ICT)
OMS OracleHome :/u01/app/oracle/mw13c
Applying the required one-off patches.
13NGCHEKAGGREGATE : oracle.sysman.top.agent
13NGCHEKAGGREGATE : oracle.sysman.top.oms
13NGCHEKAGGREGATE : encap_oms
13NGCHEKAGGREGATE : OuiConfigVariables
13NGCHEKAGGREGATE : OuiConfigVariables
2016-09-14_06-07-13PM: Configuration Assistant "Plugins Prerequisites Check" is in progress.
2016-09-14_06-07-32PM: Configuration Assistant "Plugins Prerequisites Check" has Succeeded.
2016-09-14_06-07-32PM: Configuration Assistant "Repository Out Of Box Configuration" is in progress.
2016-09-14_06-42-39PM: Configuration Assistant "Repository Out Of Box Configuration" has Succeeded.
2016-09-14_06-42-39PM: Configuration Assistant "OMS Configuration" is in progress.
Executing the OMSCA command...
Check the log files of the OMS Configuration Assistant at: /u01/app/oracle/mw13c/cfgtoollogs/omsca
OMS Configuration Assistant completed successfully.
2016-09-14_06-51-03PM: Configuration Assistant "OMS Configuration" has Succeeded.
2016-09-14_06-51-03PM: Configuration Assistant "Plugins Deployment and Configuration" is in progress.
2016-09-14_06-59-48PM: Configuration Assistant "Plugins Deployment and Configuration" has Succeeded.
2016-09-14_06-59-48PM: Configuration Assistant "BI Publisher Configuration" is in progress.
2016-09-14_07-05-20PM: Configuration Assistant "BI Publisher Configuration" has Succeeded.
2016-09-14_07-05-20PM: Configuration Assistant "Start Oracle Management Service" is in progress.
Starting OMS ...
Executing the command: /u01/app/oracle/mw13c/bin/emctl start oms
Starting of OMS is successful.
Starting export oms config...
Executing command: /u01/app/oracle/mw13c/bin/emctl exportconfig oms -dir /u01/app/oracle/gc_inst/em/EMGC_OMS1/sysman/backup
Export config of OMS is successful.
2016-09-14_07-09-43PM: Configuration Assistant "Start Oracle Management Service" has Succeeded.
2016-09-14_07-09-43PM: Configuration Assistant "Agent Configuration Assistant" is in progress.
Getting Inet Addresses for host em13c.surachartopun.com
** Agent Port Check completed successfully.**
AgentConfiguration:agent configuration has been started
Validating OMS_HOST and EM_UPLOAD_PORT
Performing free port detection..
AgentConfiguration: Executing emctl deploy agent command...
AgentConfiguration: Executing emctl config agent command...
AgentConfiguration:agent configuration finished with status = true
2016-09-14_07-12-12PM: Configuration Assistant "Agent Configuration Assistant" has Succeeded.
*** The Installation was Successful. ***
This information is also available at:
/u01/app/oracle/mw13c/install/setupinfo.txt
See the following for information pertaining to your Enterprise Manager installation:
Use the following URL to access:
1. Enterprise Manager Cloud Control URL: https://em13c.surachartopun.com:7803/em
2. Admin Server URL: https://em13c.surachartopun.com:7102/console
3. BI Publisher URL: https://em13c.surachartopun.com:9803/xmlpserver
The following details need to be provided while installing an additional OMS:
1. Admin Server Host Name: em13c.surachartopun.com
2. Admin Server Port: 7102
You can find the details on ports used by this deployment at : /u01/app/oracle/mw13c/install/portlist.ini
NOTE:
An encryption key has been generated to encrypt sensitive data in the Management Repository. If this key is lost, all encrypted data in the Repository becomes unusable.
A backup of the OMS configuration is available in /u01/app/oracle/gc_inst/em/EMGC_OMS1/sysman/backup on host em13c.surachartopun.com. See Cloud Control Administrators Guide for details on how to back up and recover an OMS.
NOTE: This backup is valid only for the initial OMS configuration. For example, it will not reflect plug-ins installed later, topology changes like the addition of a load balancer, or changes to other properties made using emctl or emcli. Backups should be created on a regular basis to ensure they capture the current OMS configuration. Use the following command to backup the OMS configuration:
/u01/app/oracle/mw13c/bin/emctl exportconfig oms -dir <backup dir>
Logs successfully copied to /u01/app/oraInventory/logs.
Note: su to "root" and run /u01/app/oracle/mw13c/allroot.sh script.
Starting to execute allroot.sh .........
Starting to execute /u01/app/oracle/mw13c/root.sh ......
/etc exist
Creating /etc/oragchomelist file...
/u01/app/oracle/mw13c
Finished product-specific root actions.
/etc exist
Finished execution of /u01/app/oracle/mw13c/root.sh ......
Starting to execute /u01/app/oracle/agent13c/agent_13.1.0.0.0/root.sh ......
Finished product-specific root actions.
/etc exist
Finished execution of /u01/app/oracle/agent13c/agent_13.1.0.0.0/root.sh ......
[root@em13c ~]# cat /etc/oragchomelist
/u01/app/oracle/mw13c
/u01/app/oracle/agent13c/agent_13.1.0.0.0:/u01/app/oracle/agent13c/agent_inst
[root@em13c ~]# find /etc/ -name ???gcstartup
/etc/rc.d/rc2.d/S98gcstartup
/etc/rc.d/rc2.d/K19gcstartup
/etc/rc.d/rc3.d/S98gcstartup
/etc/rc.d/rc3.d/K19gcstartup
/etc/rc.d/rc5.d/S98gcstartup
/etc/rc.d/rc5.d/K19gcstartup
[root@em13c ~]# cat /etc/oragchomelist
/u01/app/oracle/mw13c
/u01/app/oracle/agent13c/agent_13.1.0.0.0:/u01/app/oracle/agent13c/agent_inst
[root@em13c ~]# find /etc/ -name gcstartup
/etc/rc.d/init.d/gcstartup
[root@em13c ~]# find /etc/ -name ???gcstartup
/etc/rc.d/rc2.d/S98gcstartup
/etc/rc.d/rc2.d/K19gcstartup
/etc/rc.d/rc3.d/S98gcstartup
/etc/rc.d/rc3.d/K19gcstartup
/etc/rc.d/rc5.d/S98gcstartup
/etc/rc.d/rc5.d/K19gcstartup


Reference:
http://www.oracle.com/technetwork/oem/install-upgrade/pr-install-em13-2835293.pdf
Starting to execute allroot.sh .........
Starting to execute /u01/app/oracle/mw13c/root.sh ......
/etc exist
Creating /etc/oragchomelist file...
/u01/app/oracle/mw13c
Finished product-specific root actions.
/etc exist
Finished execution of /u01/app/oracle/mw13c/root.sh ......
Starting to execute /u01/app/oracle/agent13c/agent_13.1.0.0.0/root.sh ......
Finished product-specific root actions.
/etc exist
Finished execution of /u01/app/oracle/agent13c/agent_13.1.0.0.0/root.sh ......
[root@em13c ~]# cat /etc/oragchomelist
/u01/app/oracle/mw13c
/u01/app/oracle/agent13c/agent_13.1.0.0.0:/u01/app/oracle/agent13c/agent_inst
[root@em13c ~]# find /etc/ -name ???gcstartup
/etc/rc.d/rc2.d/S98gcstartup
/etc/rc.d/rc2.d/K19gcstartup
/etc/rc.d/rc3.d/S98gcstartup
/etc/rc.d/rc3.d/K19gcstartup
/etc/rc.d/rc5.d/S98gcstartup
/etc/rc.d/rc5.d/K19gcstartup
[root@em13c ~]# cat /etc/oragchomelist
/u01/app/oracle/mw13c
/u01/app/oracle/agent13c/agent_13.1.0.0.0:/u01/app/oracle/agent13c/agent_inst
[root@em13c ~]# find /etc/ -name gcstartup
/etc/rc.d/init.d/gcstartup
[root@em13c ~]# find /etc/ -name ???gcstartup
/etc/rc.d/rc2.d/S98gcstartup
/etc/rc.d/rc2.d/K19gcstartup
/etc/rc.d/rc3.d/S98gcstartup
/etc/rc.d/rc3.d/K19gcstartup
/etc/rc.d/rc5.d/S98gcstartup
/etc/rc.d/rc5.d/K19gcstartup
- After installed, I was able to check OMS and agent status.
[oracle@em13c scratch]$ /u01/app/oracle/mw13c/bin/emctl status oms -details
Oracle Enterprise Manager Cloud Control 13c Release 1
Copyright (c) 1996, 2015 Oracle Corporation. All rights reserved.
Enter Enterprise Manager Root (SYSMAN) Password :
Console Server Host : em13c.surachartopun.com
HTTP Console Port : 7788
HTTPS Console Port : 7803
HTTP Upload Port : 4889
HTTPS Upload Port : 4903
EM Instance Home : /u01/app/oracle/gc_inst/em/EMGC_OMS1
OMS Log Directory Location : /u01/app/oracle/gc_inst/em/EMGC_OMS1/sysman/log
OMS is not configured with SLB or virtual hostname
Agent Upload is locked.
OMS Console is locked.
Active CA ID: 1
Console URL: https://em13c.surachartopun.com:7803/em
Upload URL: https://em13c.surachartopun.com:4903/empbs/upload
WLS Domain Information
Domain Name : GCDomain
Admin Server Host : em13c.surachartopun.com
Admin Server HTTPS Port: 7102
Admin Server is RUNNING
Oracle Management Server Information
Managed Server Instance Name: EMGC_OMS1
Oracle Management Server Instance Host: em13c.surachartopun.com
WebTier is Up
Oracle Management Server is Up
JVMD Engine is Up
BI Publisher Server Information
BI Publisher Managed Server Name: BIP
BI Publisher Server is Up
BI Publisher HTTP Managed Server Port : 9701
BI Publisher HTTPS Managed Server Port : 9803
BI Publisher HTTP OHS Port : 9788
BI Publisher HTTPS OHS Port : 9851
BI Publisher is locked.
BI Publisher Server named 'BIP' running at URL: https://em13c.surachartopun.com:9851/xmlpserver
BI Publisher Server Logs: /u01/app/oracle/gc_inst/user_projects/domains/GCDomain/servers/BIP/logs/
BI Publisher Log : /u01/app/oracle/gc_inst/user_projects/domains/GCDomain/servers/BIP/logs/bipublisher/bipublisher.log
[oracle@em13c scratch]$ /u01/app/oracle/agent13c/agent_13.1.0.0.0/bin/emctl status agent
[Oracle Enterprise Manager Cloud Control 13c Release 1
Copyright (c) 1996, 2015 Oracle Corporation. All rights reserved.
---------------------------------------------------------------
Agent Version : 13.1.0.0.0
OMS Version : 13.1.0.0.0
Protocol Version : 12.1.0.1.0
Agent Home : /u01/app/oracle/agent13c/agent_inst
Agent Log Directory : /u01/app/oracle/agent13c/agent_inst/sysman/log
Agent Binaries : /u01/app/oracle/agent13c/agent_13.1.0.0.0
Core JAR Location : /u01/app/oracle/agent13c/agent_13.1.0.0.0/jlib
Agent Process ID : 26632
Parent Process ID : 26568
Agent URL : https://em13c.surachartopun.com:3872/emd/main/
Local Agent URL in NAT : https://em13c.surachartopun.com:3872/emd/main/
Repository URL : https://em13c.surachartopun.com:4903/empbs/upload
Started at : 2016-09-14 19:11:49
Started by user : oracle
Operating System : Linux version 3.10.0-327.28.3.el7.x86_64 (amd64)
Number of Targets : 32
Last Reload : (none)
Last successful upload : 2016-09-14 20:03:22
Last attempted upload : 2016-09-14 20:03:22
Total Megabytes of XML files uploaded so far : 1.56
Number of XML files pending upload : 0
Size of XML files pending upload(MB) : 0
Available disk space on upload filesystem : 40.54%
Collection Status : Collections enabled
Heartbeat Status : Ok
Last attempted heartbeat to OMS : 2016-09-14 20:05:00
Last successful heartbeat to OMS : 2016-09-14 20:05:00
Next scheduled heartbeat to OMS : 2016-09-14 20:06:00
---------------------------------------------------------------
Agent is Running and Ready
- Connected OEM 13c by browser.


http://www.oracle.com/technetwork/oem/install-upgrade/pr-install-em13-2835293.pdf
Categories: DBA Blogs
Packt - Time to learn Oracle and Linux
What is your resolution for learning? Learn Oracle, Learn Linux or both. It' s a good news for people who are interested in improving Oracle and Linux skills. Packt Promotional (discount of 50%) for eBooks & videos from today until 23rd Feb, 2016.


Categories: DBA Blogs
AWS EC2 API tools: Create snapshot & Check Data in snapshot
After installed AWS EC2 API tools, It's time for example create/delete snapshot.
- Creating snapshot.ubuntu@ip-x-x-x-x~$ ec2-describe-volumes
VOLUME vol-41885f55 8 snap-d00ac9e4 ap-southeast-1a in-use 2015-05-26T09:07:04+0000 gp2 24
ATTACHMENT vol-41885f55 i-d6cdb71a /dev/sda1 attached 2015-05-26T09:07:04+0000 true
ubuntu@ip-x-x-x-x:~$ ec2-create-snapshot -d vol-41885f55-$(date +%Y%m%d%H%M) vol-41885f55
SNAPSHOT snap-b20a8c87 vol-41885f55 pending 2015-05-27T05:46:58+0000 843870022970 8 vol-41885f55-201505270546
ubuntu@ip-x-x-x-x:~$ ec2-describe-snapshots
SNAPSHOT snap-b20a8c87 vol-41885f55 pending 2015-05-27T05:46:58+0000 0% 843870022970 8 vol-41885f55-201505270546
ubuntu@ip-x-x-x-x:~$ ec2-create-snapshot -d vol-41885f55-$(date +%Y%m%d%H%M) vol-41885f55
SNAPSHOT snap-bea0d28b vol-41885f55 pending 2015-05-27T05:50:11+0000 843870022970 8 vol-41885f55-201505270550
ubuntu@ip-x-x-x-x:~$ ec2-describe-snapshots
SNAPSHOT snap-b20a8c87 vol-41885f55 completed 2015-05-27T05:46:58+0000 100% 843870022970 8 vol-41885f55-201505270546
SNAPSHOT snap-bea0d28b vol-41885f55 completed 2015-05-27T05:50:11+0000 100% 843870022970 8 vol-41885f55-201505270550- Deleting snapshot (delete snap-b20a8c87).
ubuntu@ip-x-x-x-x:~$ ec2-describe-snapshots |head -1| awk '{print $2}'|xargs ec2-delete-snapshot
SNAPSHOT snap-b20a8c87
ubuntu@ip-x-x-x-x:~$ ec2-describe-snapshots
SNAPSHOT snap-bea0d28b vol-41885f55 completed 2015-05-27T05:50:11+0000 100% 843870022970 8 vol-41885f55-201505270550How to check data in "snap-bea0d28b"? Checking idea on AWS, look like we must create Volume from snapshot and attach it to Instance.
- Creating Volume > Attach to Instance and Mount.
ubuntu@ip-x-x-x-x:~$ ec2-describe-volumes
VOLUME vol-41885f55 8 snap-d00ac9e4 ap-southeast-1a in-use 2015-05-26T09:07:04+0000 gp2 24
ATTACHMENT vol-41885f55 i-d6cdb71a /dev/sda1 attached 2015-05-26T09:07:04+0000 true
ubuntu@ip-x-x-x-x:~$ ec2-describe-availability-zones
AVAILABILITYZONE ap-southeast-1a available ap-southeast-1
AVAILABILITYZONE ap-southeast-1b available ap-southeast-1
ubuntu@ip-x-x-x-x:~$ ec2-create-volume -s 8 --snapshot snap-bea0d28b -z ap-southeast-1a
VOLUME vol-d15087c5 8 snap-bea0d28b ap-southeast-1a creating 2015-05-27T06:24:00+0000 standard
ubuntu@ip-x-x-x-x:~$ ec2-describe-volumes
VOLUME vol-41885f55 8 snap-d00ac9e4 ap-southeast-1a in-use 2015-05-26T09:07:04+0000 gp2 24
ATTACHMENT vol-41885f55 i-d6cdb71a /dev/sda1 attached 2015-05-26T09:07:04+0000 true
VOLUME vol-d15087c5 8 snap-bea0d28b ap-southeast-1a available 2015-05-27T06:24:00+0000 standard
ubuntu@ip-x-x-x-x:~$ sudo fdisk -l
Disk /dev/xvda: 8589 MB, 8589934592 bytes
255 heads, 63 sectors/track, 1044 cylinders, total 16777216 sectors
Units = sectors of 1 * 512 = 512 bytes
Sector size (logical/physical): 512 bytes / 512 bytes
I/O size (minimum/optimal): 512 bytes / 512 bytes
Disk identifier: 0x00000000
Device Boot Start End Blocks Id System
/dev/xvda1 * 16065 16771859 8377897+ 83 Linux
ubuntu@ip-x-x-x-x:~$ ec2-attach-volume vol-d15087c5 -i i-d6cdb71a -d sdf
ATTACHMENT vol-d15087c5 i-d6cdb71a sdf attaching 2015-05-27T06:31:16+0000
ubuntu@ip-x-x-x-x:~$ sudo fdisk -l
Disk /dev/xvda: 8589 MB, 8589934592 bytes
255 heads, 63 sectors/track, 1044 cylinders, total 16777216 sectors
Units = sectors of 1 * 512 = 512 bytes
Sector size (logical/physical): 512 bytes / 512 bytes
I/O size (minimum/optimal): 512 bytes / 512 bytes
Disk identifier: 0x00000000
Device Boot Start End Blocks Id System
/dev/xvda1 * 16065 16771859 8377897+ 83 Linux
Disk /dev/xvdf: 8589 MB, 8589934592 bytes
255 heads, 63 sectors/track, 1044 cylinders, total 16777216 sectors
Units = sectors of 1 * 512 = 512 bytes
Sector size (logical/physical): 512 bytes / 512 bytes
I/O size (minimum/optimal): 512 bytes / 512 bytes
Disk identifier: 0x00000000
Device Boot Start End Blocks Id System
/dev/xvdf1 * 16065 16771859 8377897+ 83 Linux
ubuntu@ip-x-x-x-x:~$
ubuntu@ip-x-x-x-x:~$ df
Filesystem 1K-blocks Used Available Use% Mounted on
/dev/xvda1 8115168 1212140 6467752 16% /
none 4 0 4 0% /sys/fs/cgroup
udev 503188 12 503176 1% /dev
tmpfs 101632 332 101300 1% /run
none 5120 0 5120 0% /run/lock
none 508144 0 508144 0% /run/shm
none 102400 0 102400 0% /run/user
ubuntu@ip-x-x-x-x:~$ sudo mount /dev/xvdf1 /mnt/
ubuntu@ip-x-x-x-x:~$ ls -l /mnt/
total 92
drwxr-xr-x 2 root root 4096 May 26 09:35 bin
drwxr-xr-x 3 root root 4096 Mar 25 11:52 boot
drwxr-xr-x 5 root root 4096 Mar 25 11:53 dev
drwxr-xr-x 105 root root 4096 May 26 09:35 etc
drwxr-xr-x 3 root root 4096 May 26 09:07 home
lrwxrwxrwx 1 root root 33 Mar 25 11:51 initrd.img -> boot/initrd.img-3.13.0-48-generic
drwxr-xr-x 21 root root 4096 May 26 09:35 lib
drwxr-xr-x 2 root root 4096 Mar 25 11:50 lib64
drwx------ 2 root root 16384 Mar 25 11:53 lost+found
drwxr-xr-x 2 root root 4096 Mar 25 11:50 media
drwxr-xr-x 2 root root 4096 Apr 10 2014 mnt
drwxr-xr-x 2 root root 4096 Mar 25 11:50 opt
drwxr-xr-x 2 root root 4096 Apr 10 2014 proc
drwx------ 3 root root 4096 May 26 09:07 root
drwxr-xr-x 3 root root 4096 Mar 25 11:53 run
drwxr-xr-x 2 root root 4096 May 26 09:35 sbin
drwxr-xr-x 2 root root 4096 Mar 25 11:50 srv
drwxr-xr-x 2 root root 4096 Mar 13 2014 sys
drwxrwxrwt 6 root root 4096 May 27 05:38 tmp
drwxr-xr-x 10 root root 4096 Mar 25 11:50 usr
drwxr-xr-x 12 root root 4096 Mar 25 11:52 var
lrwxrwxrwx 1 root root 30 Mar 25 11:51 vmlinuz -> boot/vmlinuz-3.13.0-48-generic
ubuntu@ip-x-x-x-x:~$ ls /mnt/
bin boot dev etc home initrd.img lib lib64 lost+found media mnt opt proc root run sbin srv sys tmp usr var vmlinuz
ubuntu@ip-x-x-x-x:~$ df -h
Filesystem Size Used Avail Use% Mounted on
/dev/xvda1 7.8G 1.2G 6.2G 16% /
none 4.0K 0 4.0K 0% /sys/fs/cgroup
udev 492M 12K 492M 1% /dev
tmpfs 100M 332K 99M 1% /run
none 5.0M 0 5.0M 0% /run/lock
none 497M 0 497M 0% /run/shm
none 100M 0 100M 0% /run/user
/dev/xvdf1 7.8G 1.2G 6.2G 16% /mnt- After checking data, We can unmount and remove it.
ubuntu@ip-x-x-x-x:~$ sudo umount /mnt
ubuntu@ip-x-x-x-x:~$
ubuntu@ip-x-x-x-x:~$
ubuntu@ip-x-x-x-x:~$ df
Filesystem 1K-blocks Used Available Use% Mounted on
/dev/xvda1 8115168 1212140 6467752 16% /
none 4 0 4 0% /sys/fs/cgroup
udev 503188 12 503176 1% /dev
tmpfs 101632 332 101300 1% /run
none 5120 0 5120 0% /run/lock
none 508144 0 508144 0% /run/shm
none 102400 0 102400 0% /run/user
ubuntu@ip-x-x-x-x:~$ sudo fdisk -l
Disk /dev/xvda: 8589 MB, 8589934592 bytes
255 heads, 63 sectors/track, 1044 cylinders, total 16777216 sectors
Units = sectors of 1 * 512 = 512 bytes
Sector size (logical/physical): 512 bytes / 512 bytes
I/O size (minimum/optimal): 512 bytes / 512 bytes
Disk identifier: 0x00000000
Device Boot Start End Blocks Id System
/dev/xvda1 * 16065 16771859 8377897+ 83 Linux
Disk /dev/xvdf: 8589 MB, 8589934592 bytes
255 heads, 63 sectors/track, 1044 cylinders, total 16777216 sectors
Units = sectors of 1 * 512 = 512 bytes
Sector size (logical/physical): 512 bytes / 512 bytes
I/O size (minimum/optimal): 512 bytes / 512 bytes
Disk identifier: 0x00000000
Device Boot Start End Blocks Id System
/dev/xvdf1 * 16065 16771859 8377897+ 83 Linux
ubuntu@ip-x-x-x-x:~$
ubuntu@ip-x-x-x-x:~$ ec2-describe-volumes
VOLUME vol-41885f55 8 snap-d00ac9e4 ap-southeast-1a in-use 2015-05-26T09:07:04+0000 gp2 24
ATTACHMENT vol-41885f55 i-d6cdb71a /dev/sda1 attached 2015-05-26T09:07:04+0000 true
VOLUME vol-d15087c5 8 snap-bea0d28b ap-southeast-1a in-use 2015-05-27T06:24:00+0000 standard
ATTACHMENT vol-d15087c5 i-d6cdb71a sdf attached 2015-05-27T06:31:16+0000 false
ubuntu@ip-x-x-x-x:~$ ec2-detach-volume vol-d15087c5 -i i-d6cdb71a
ATTACHMENT vol-d15087c5 i-d6cdb71a sdf detaching 2015-05-27T06:31:16+0000
ubuntu@ip-x-x-x-x:~$ ec2-describe-volumes
VOLUME vol-41885f55 8 snap-d00ac9e4 ap-southeast-1a in-use 2015-05-26T09:07:04+0000 gp2 24
ATTACHMENT vol-41885f55 i-d6cdb71a /dev/sda1 attached 2015-05-26T09:07:04+0000 true
VOLUME vol-d15087c5 8 snap-bea0d28b ap-southeast-1a in-use 2015-05-27T06:24:00+0000 standard
ATTACHMENT vol-d15087c5 i-d6cdb71a sdf detaching 2015-05-27T06:31:16+0000 falseubuntu@ip-x-x-x-x:~$ ec2-describe-volumes
VOLUME vol-41885f55 8 snap-d00ac9e4 ap-southeast-1a in-use 2015-05-26T09:07:04+0000 gp2 24
ATTACHMENT vol-41885f55 i-d6cdb71a /dev/sda1 attached 2015-05-26T09:07:04+0000 true
VOLUME vol-d15087c5 8 snap-bea0d28b ap-southeast-1a available 2015-05-27T06:24:00+0000 standard
ubuntu@ip-x-x-x-x:~$ ec2-delete-volume vol-d15087c5
VOLUME vol-d15087c5
ubuntu@ip-x-x-x-x:~$ ec2-describe-volumes
VOLUME vol-41885f55 8 snap-d00ac9e4 ap-southeast-1a in-use 2015-05-26T09:07:04+0000 gp2 24
ATTACHMENT vol-41885f55 i-d6cdb71a /dev/sda1 attached 2015-05-26T09:07:04+0000 trueLook like it's easy to use and adapt with script.
Categories: DBA Blogs
AWS EC2 API tools: Installation
AWS EC2 API tools help too much for Amazon EC2 to register and launch instances, manipulate security groups, and more. Someone asked me to backup EC2 instance. I thought to use it for backup script. Anyway, No need to explain more how to install Amazon EC2 API tools on Ubuntu? Just say thank for EC2StartersGuide. I fellow this link and installed it easily. Additional, I used this Link for more idea about java.
- Adding Repository and Install EC2 API tools.
ubuntu@ip-x-x-x-x:~$ sudo apt-add-repository ppa:awstools-dev/awstools
Up to date versions of several tools from AWS.
Use this repository by:
sudo apt-add-repository ppa:awstools-dev/awstools
sudo apt-get update
sudo apt-get install ec2-api-tools
.
.
.
ubuntu@ip-x-x-x-x:~$ sudo apt-get update
ubuntu@ip-x-x-x-x:~$ sudo apt-get install ec2-api-tools
ubuntu@ip-x-x-x-x:~$ sudo apt-get install -y openjdk-7-jre
ubuntu@ip-x-x-x-x:~$ file $(which java)
/usr/bin/java: symbolic link to `/etc/alternatives/java'
ubuntu@ip-x-x-x-x:~$ file /etc/alternatives/java
/etc/alternatives/java: symbolic link to `/usr/lib/jvm/java-7-openjdk-amd64/jre/bin/java'- Adding variables in ~/.bashrs file. We should have "Access Key" - Security Credentials.
ubuntu@ip-x-x-x-x:~$ vi ~/.bashrc
.
.
.
export EC2_KEYPAIR=***
export EC2_URL=https://ec2.ap-southeast-1.amazonaws.com
export EC2_PRIVATE_KEY=$HOME/.ec2/pk-***.pem
export EC2_CERT=$HOME/.ec2/cert-***.pem
export JAVA_HOME=/usr/lib/jvm/java-7-openjdk-amd64/jre
ubuntu@ip-x-x-x-x:~$ source ~/.bashrc- If everything's all right. Time to use it.
ubuntu@ip-x-x-x-x:~$ ec2-describe-regions
REGION eu-central-1 ec2.eu-central-1.amazonaws.com
REGION sa-east-1 ec2.sa-east-1.amazonaws.com
REGION ap-northeast-1 ec2.ap-northeast-1.amazonaws.com
REGION eu-west-1 ec2.eu-west-1.amazonaws.com
REGION us-east-1 ec2.us-east-1.amazonaws.com
REGION us-west-1 ec2.us-west-1.amazonaws.com
REGION us-west-2 ec2.us-west-2.amazonaws.com
REGION ap-southeast-2 ec2.ap-southeast-2.amazonaws.com
REGION ap-southeast-1 ec2.ap-southeast-1.amazonaws.comubuntu@ip-x-x-x-x:~$ ec2-describe-availability-zones
AVAILABILITYZONE ap-southeast-1a available ap-southeast-1
AVAILABILITYZONE ap-southeast-1b available ap-southeast-1
Categories: DBA Blogs
Packt - The $5 eBook Bonanza is here!

Categories: DBA Blogs
How Linux Works, 2nd Edition What Every Superuser Should Know by Brian Ward; No Starch Press

You can read more on link what I pointed to it. For me, Linux is a great operating system that I can use it as Desktop and Server. I have used it over ten years. It's very interesting operation system. I have used/worked it with many Open Source Software such as Apache HTTP, Bind, Sendmail, Postfix, Cyrus Imap, Samba and etc. It's operating system that I can play with programming languages as C, PHP, JAVA, Python, Perl and etc. I don't wanna say "too much".
Today, I have a chance to pick up some... a book that was written about Linux - How Linux Works, 2nd Edition What Every Superuser Should Know by Brian Ward. It's a cool book that you can learn about Linux as Starter and Linux Administrator. You could learn some things you have never used, but find in this book. It's fun to learn. However, A book, it's not support every skills in Linux. You will learn
- How Linux boots, from boot loaders to init implementations (systemd, Upstart, and System V)
- How the kernel manages devices, device drivers, and processes
- How networking, interfaces, firewalls, and servers work
- How development tools work and relate to shared libraries
- How to write effective shell scripts
Categories: DBA Blogs
Oracle Database 12C Certified Professional SQL Foundations by Steve Ries; Infinite Skills

With Step 1 - Oracle Database 12c: SQL Fundamentals 1Z0-061 exam that you should have skills SQL SELECT statement, subqueries, data manipulation, and data definition language. I was not encouraging to learn SQL SELECT statement, subqueries, data manipulation, data definition language and things like that, but in the real-world for working with Oracle Database you have to know them. You can read about them in Oracle Documents, Oracle Learning Library, Oracle University and the Internet. If you are looking for some video training that instruct you for Oracle Database SQL Foundations such as sql-select, dml, ddl and etc. I mention Oracle Database - 12C Certified Professional SQL Foundations by Steve Ries. I watched it on O'reilly,that is very fast for streaming and downloading. The "Oracle Database - 12C Certified Professional SQL Foundations" video training, that helps learning Oracle Foundations looks easier (watch and do by own) and instructor spoke each topic very clear and easy for listening.
FYI, You can watch some free video.
Video Training: Oracle Database - 12C Certified Professional SQL Foundation
Instructor: Steve Ries
Categories: DBA Blogs
Think Stats, 2nd Edition Exploratory Data Analysis By Allen B. Downey; O'Reilly Media

This second edition of Think Stats includes the chapters from the first edition, many of them substantially revised, and new chapters on regression, time series analysis, survival analysis, and analytic methods. Additional, It uses uses pandas, SciPy, or StatsModels in Python. Author developed this book using Anaconda from Continuum Analytics. Readers should use it, that will easy from them. Anyway, I tested on Ubuntu and installed pandas, NumPy, SciPy, StatsModels, and matplotlib packages. This book has 14 chapters relate with processes that author works with a dataset. It's for intermediate reader. So, Readers should know how to program (In a book uses Python), and skill in mathematical + statistical.
Each chapter includes exercises that readers can practice and get more understood. Free Sampler
- Develop an understanding of probability and statistics by writing and testing code.
- Run experiments to test statistical behavior, such as generating samples from several distributions.
- Use simulations to understand concepts that are hard to grasp mathematically.
- Import data from most sources with Python, rather than rely on data that’s cleaned and formatted for statistics tools.
- Use statistical inference to answer questions about real-world data.
/home/surachart/ThinkStats2/code
surachart@surachart:~/ThinkStats2/code$ ipython notebook --ip=0.0.0.0 --pylab=inline &
[1] 11324
surachart@surachart:~/ThinkStats2/code$ 2014-11-17 19:39:43.201 [NotebookApp] Using existing profile dir: u'/home/surachart/.config/ipython/profile_default'
2014-11-17 19:39:43.210 [NotebookApp] Using system MathJax
2014-11-17 19:39:43.234 [NotebookApp] Serving notebooks from local directory: /home/surachart/ThinkStats2/code
2014-11-17 19:39:43.235 [NotebookApp] The IPython Notebook is running at: http://0.0.0.0:8888/
2014-11-17 19:39:43.236 [NotebookApp] Use Control-C to stop this server and shut down all kernels (twice to skip confirmation).
2014-11-17 19:39:43.236 [NotebookApp] WARNING | No web browser found: could not locate runnable browser.
2014-11-17 19:39:56.120 [NotebookApp] Connecting to: tcp://127.0.0.1:38872
2014-11-17 19:39:56.127 [NotebookApp] Kernel started: f24554a8-539f-426e-9010-cb3aa3386613
2014-11-17 19:39:56.506 [NotebookApp] Connecting to: tcp://127.0.0.1:43369
2014-11-17 19:39:56.512 [NotebookApp] Connecting to: tcp://127.0.0.1:33239
2014-11-17 19:39:56.516 [NotebookApp] Connecting to: tcp://127.0.0.1:54395

Book: Think Stats, 2nd Edition Exploratory Data Analysis
Author: Allen B. Downey(@allendowney)
Categories: DBA Blogs
Getting Started with Impala Interactive SQL for Apache Hadoop by John Russell; O'Reilly Media

In a book, it doesn't assist readers to install Impala or how to solve the issue from installation or configuration. It has 5 chapters and not much for the number of pages, but enough to guide how to use Impala (Interactive SQL) and has good examples. With chapter 5 - Tutorials and Deep Dives, that it's highlight in a book and the example in a chapter that is very useful.
Free Sampler.
This book assists readers.
- Learn how Impala integrates with a wide range of Hadoop components
- Attain high performance and scalability for huge data sets on production clusters
- Explore common developer tasks, such as porting code to Impala and optimizing performance
- Use tutorials for working with billion-row tables, date- and time-based values, and other techniques
- Learn how to transition from rigid schemas to a flexible model that evolves as needs change
- Take a deep dive into joins and the roles of statistics
Query: select "Surachart Opun" Name, NOW()
+----------------+-------------------------------+
| name | now() |
+----------------+-------------------------------+
| Surachart Opun | 2014-10-25 23:34:03.217635000 |
+----------------+-------------------------------+
Returned 1 row(s) in 0.14sAuthor: John Russell (@max_webster)
Categories: DBA Blogs
Learning Spark Lightning-Fast Big Data Analytics by Holden Karau, Andy Konwinski, Patrick Wendell, Matei Zaharia; O'Reilly Media

If you would like a book about Spark - Learning Spark Lightning-Fast Big Data Analytics by Holden Karau, Andy Konwinski, Patrick Wendell, Matei Zaharia. It's a great book for who is interested in Spark development and starting with it. Readers will learn how to express MapReduce jobs with just a few simple lines of Spark code and more...
- Quickly dive into Spark capabilities such as collect, count, reduce, and save
- Use one programming paradigm instead of mixing and matching tools such as Hive, Hadoop, Mahout, and S4/Storm
- Learn how to run interactive, iterative, and incremental analyses
- Integrate with Scala to manipulate distributed datasets like local collections
- Tackle partitioning issues, data locality, default hash partitioning, user-defined partitioners, and custom serialization
- Use other languages by means of pipe() to achieve the equivalent of Hadoop streaming
With Early Release - 7 chapters. Explained Apache Spark overview, downloading and commands that should know, programming with RDDS (+ more advance) as well as working with Key-Value Pairs, etc. Easy to read and Good examples in a book. For people who want to learn Apache Spark or use Spark for Data Analytic. It's a book, that should keep in shelf.
Book: Learning Spark Lightning-Fast Big Data Analytics
Authors: Holden Karau, Andy Konwinski, Patrick Wendell, Matei Zaharia
Book: Learning Spark Lightning-Fast Big Data Analytics
Authors: Holden Karau, Andy Konwinski, Patrick Wendell, Matei Zaharia
Categories: DBA Blogs
Using Flume - Flexible, Scalable, and Reliable Data Streaming by Hari Shreedharan; O'Reilly Media

Apache Flume is a distributed, reliable, and available service for efficiently collecting, aggregating, and moving large amounts of log data.It uses a simple data model. Source => Channel => Sink
It's a good time to introduce a good book about Flume - Using Flume - Flexible, Scalable, and Reliable Data Streaming by Hari Shreedharan (@harisr1234). It was written with 8 Chapters: giving basic about Apache Hadoop and Apache HBase, idea for Streaming Data Using Apache Flume, about Flume Model (Sources, Channels, Sinks), and some moew for Interceptors, Channel Selectors, Sink Groups, and Sink Processors. Additional, Getting Data into Flume* and Planning, Deploying, and Monitoring Flume.
This book was written about how to use Flume. It's very good to guide about Apache Hadoop and Apache HBase before starting about Flume Data flow model. Readers should know about java code, because they will find java code example in a book and easy to understand. It's a good book for some people who want to deploy Apache Flume and custom components.
Author separated each Chapter for Flume Data flow model. So, Readers can choose each chapter to read for part of Data flow model: reader would like to know about Sink, then read Chapter 5 only until get idea. In addition, Flume has a lot of features, Readers will find example for them in a book. Each chapter has references topic, that readers can use it to find out more and very easy + quick to use in Ebook.
With Illustration in a book that is helpful with readers to see Big Picture using Flume and giving idea to develop it more in each System or Project.
So, Readers will be able to learn about operation and how to configure, deploy, and monitor a Flume cluster, and customize examples to develop Flume plugins and custom components for their specific use-cases.
- Learn how Flume provides a steady rate of flow by acting as a buffer between data producers and consumers
- Dive into key Flume components, including sources that accept data and sinks that write and deliver it
- Write custom plugins to customize the way Flume receives, modifies, formats, and writes data
- Explore APIs for sending data to Flume agents from your own applications
- Plan and deploy Flume in a scalable and flexible way—and monitor your cluster once it’s running
Author: Hari Shreedharan
Categories: DBA Blogs
rsyslog: Send logs to Flume
Good day for learning something new. After read Flume book, that something popped up in my head. Wanted to test "rsyslog" => Flume => HDFS. As we know, forwarding log to other systems. We can set rsyslog:
*.* @YOURSERVERADDRESS:YOURSERVERPORT ## for UDP
*.* @@YOURSERVERADDRESS:YOURSERVERPORT ## for TCPFor rsyslog:
[root@centos01 ~]# grep centos /etc/rsyslog.conf
*.* @centos01:7777Came back to Flume, I used Simple Example for reference and changed a bit. Because I wanted it write to HDFS.
[root@centos01 ~]# grep "^FLUME_AGENT_NAME\=" /etc/default/flume-agent
FLUME_AGENT_NAME=a1
[root@centos01 ~]# cat /etc/flume/conf/flume.conf
# example.conf: A single-node Flume configuration
# Name the components on this agent
a1.sources = r1
a1.sinks = k1
a1.channels = c1
# Describe/configure the source
#a1.sources.r1.type = netcat
a1.sources.r1.type = syslogudp
a1.sources.r1.bind = 0.0.0.0
a1.sources.r1.port = 7777
# Describe the sink
#a1.sinks.k1.type = logger
a1.sinks.k1.type = hdfs
a1.sinks.k1.hdfs.path = hdfs://localhost:8020/user/flume/syslog/%Y/%m/%d/%H/
a1.sinks.k1.hdfs.fileType = DataStream
a1.sinks.k1.hdfs.writeFormat = Text
a1.sinks.k1.hdfs.batchSize = 10000
a1.sinks.k1.hdfs.rollSize = 0
a1.sinks.k1.hdfs.rollCount = 10000
a1.sinks.k1.hdfs.filePrefix = syslog
a1.sinks.k1.hdfs.round = true
# Use a channel which buffers events in memory
a1.channels.c1.type = memory
a1.channels.c1.capacity = 1000
a1.channels.c1.transactionCapacity = 100
# Bind the source and sink to the channel
a1.sources.r1.channels = c1
a1.sinks.k1.channel = c1
[root@centos01 ~]# /etc/init.d/flume-agent start
Flume NG agent is not running [FAILED]
Starting Flume NG agent daemon (flume-agent): [ OK ]Tested to login by ssh.
[root@centos01 ~]# tail -0f /var/log/flume/flume.log
06 Oct 2014 16:35:40,601 INFO [hdfs-k1-call-runner-0] (org.apache.flume.sink.hdfs.BucketWriter.doOpen:208) - Creating hdfs://localhost:8020/user/flume/syslog/2014/10/06/16//syslog.1412588139067.tmp
06 Oct 2014 16:36:10,957 INFO [hdfs-k1-roll-timer-0] (org.apache.flume.sink.hdfs.BucketWriter.renameBucket:427) - Renaming hdfs://localhost:8020/user/flume/syslog/2014/10/06/16/syslog.1412588139067.tmp to hdfs://localhost:8020/user/flume/syslog/2014/10/06/16/syslog.1412588139067
[root@centos01 ~]# hadoop fs -ls hdfs://localhost:8020/user/flume/syslog/2014/10/06/16/syslog.1412588139067
14/10/06 16:37:31 WARN util.NativeCodeLoader: Unable to load native-hadoop library for your platform... using builtin-java classes where applicable
Found 1 items
-rw-r--r-- 1 flume supergroup 299 2014-10-06 16:36 hdfs://localhost:8020/user/flume/syslog/2014/10/06/16/syslog.1412588139067
[root@centos01 ~]#
[root@centos01 ~]#
[root@centos01 ~]# hadoop fs -cat hdfs://localhost:8020/user/flume/syslog/2014/10/06/16/syslog.1412588139067
14/10/06 16:37:40 WARN util.NativeCodeLoader: Unable to load native-hadoop library for your platform... using builtin-java classes where applicable
sshd[20235]: Accepted password for surachart from 192.168.111.16 port 65068 ssh2
sshd[20235]: pam_unix(sshd:session): session opened for user surachart by (uid=0)
su: pam_unix(su-l:session): session opened for user root by surachart(uid=500)
su: pam_unix(su-l:session): session closed for user rootLook good... Anyway, It needs to adapt more...
Categories: DBA Blogs
Packt Publishing - ALL eBooks and Videos are just $10 each or less until the 2nd of October

- Any 1 or 2 eBooks/Videos -- $10 each
- Any 3-5 eBooks/Videos -- $8 each
- Any 6 or more eBooks/Videos -- $6 each
Categories: DBA Blogs
I Heart Logs - Event Data, Stream Processing, and Data Integration by Jay Kreps; O'Reilly Media
 As I have worked in server-side a long time as System Administrator. I must spend with logs. To use it for checking and investigation in issue. As some policies in some Companies, they want to keep logs over year or over ten years. So, it is not unusual to find out idea to store, integrate logs and do something.
A book tittle "I Heart Logs - Event Data, Stream Processing, and Data Integration" by Jay Kreps. It's very interesting. I'd like to know what I can learn from it, how logs work in distributed systems and learn from author who works at LinkedIn. A book! Not much for the number of pages. However, it gives much more for data flow idea, how logs work and author still shows readers why logs are worthy of reader's attention. In a book, that has only 4 chapters, but readers will get concept and idea about Data integration (Making all of an organization’s data easily available in all its storage and processing systems), Real-time data processing (Computing derived data streams) and Distributed system design (How practical systems can by simplified with a log-centric design). In addition, I like it. because author wrote from his experience at LinkedIn.
After reviewing: A book refers a lot of information(It's easy on ebook to click links) that's useful. Readers can use them and find out more on the Internet and use. For Data integration, It's focused to Kafka software that is a distributed, partitioned, replicated commit log service. It provides the functionality of a messaging system. Additional, It gave why the Big Data Lambda Architecture is good for batch system and a stream processing system and point about things a log can do.
So, Readers will be able to learn:
- Learn how logs are used for programmatic access in databases and distributed systems
- Discover solutions to the huge data integration problem when more data of more varieties meet more systems
- Understand why logs are at the heart of real-time stream processing
- Learn the role of a log in the internals of online data systems
- Explore how Jay Kreps applies these ideas to his own work on data infrastructure systems at LinkedIn
Author: Jay Kreps
Categories: DBA Blogs
Where is my space on Linux filesystem?
Not Often, I checked about my space after made filesystem on Linux. Today, I have made Ext4 filesystem around 460GB, I found it 437GB only. Some path should be 50GB, but it was available only 47GB.
Thank You @OracleAlchemist and @gokhanatil for good information about it.
Filesystem Size Used Avail Use% Mounted on
/dev/mapper/VolGroup0-U01LV 50G 52M 47G 1% /u01
Reference - It's for specify the percentage of the filesystem blocks reserved for the super-user. This avoids fragmentation, and allows root-owned daemons, such as syslogd(8), to continue to function correctly after non-privileged processes are prevented from writing to the filesystem. The default percentage is 5%.
After I found out more information. Look like we can set it to zero, but we should not set it to zero for /,/var,/tmp or which path has lots of file creates and deletes.
If you set the reserved block count to zero, it won't affect
performance much except if you run for long periods of time (with lots
of file creates and deletes) while the filesystem is almost full
(i.e., say above 95%), at which point you'll be subject to
fragmentation problems. Ext4's multi-block allocator is much more
fragmentation resistant, because it tries much harder to find
contiguous blocks, so even if you don't enable the other ext4
features, you'll see better results simply mounting an ext3 filesystem
using ext4 before the filesystem gets completely full.
If you are just using the filesystem for long-term archive, where
files aren't changing very often (i.e., a huge mp3 or video store), it
obviously won't matter.
- Ted
Filesystem Size Used Avail Use% Mounted on
/dev/mapper/VolGroup0-U01LV 50G 52M 47G 1% /u01
[root@mytest01 u01]# tune2fs -m 1 /dev/mapper/VolGroup0-U01LV
tune2fs 1.43-WIP (20-Jun-2013)
Setting reserved blocks percentage to 1% (131072 blocks)
[root@mytest01 u01]# df -h /u01
Filesystem Size Used Avail Use% Mounted on
/dev/mapper/VolGroup0-U01LV 50G 52M 49G 1% /u01
[root@mytest01 u01]# tune2fs -m 5 /dev/mapper/VolGroup0-U01LV
tune2fs 1.43-WIP (20-Jun-2013)
Setting reserved blocks percentage to 5% (655360 blocks)
[root@mytest01 u01]# df -h /u01
Filesystem Size Used Avail Use% Mounted on
/dev/mapper/VolGroup0-U01LV 50G 52M 47G 1% /u01Finally, I knew it was reserved for super-user. Checked more for calculation.
[root@ottuatdb01 ~]# df -m /u01
Filesystem 1M-blocks Used Available Use% Mounted on
/dev/mapper/VolGroup0-U01LV 50269 52 47657 1% /u01
[root@ottuatdb01 ~]# tune2fs -l /dev/mapper/VolGroup0-U01LV |egrep 'Block size|Reserved block count'
Reserved block count: 655360
Block size: 4096
Available = 47657MB
Used = 52M
Reserved Space = (655360 x 4096) / 1024 /1024 = 2560MB
Total = 47657 + 2560 + 52 = 50269
OK.. I felt good after it cleared for me. Somehow, I believe On Hug space, 5% of the filesystem blocks reserved that's too much. We can reduce it.
Other Links:
https://www.redhat.com/archives/ext3-users/2009-January/msg00026.html
http://unix.stackexchange.com/questions/7950/reserved-space-for-root-on-a-filesystem-why
http://linux.die.net/man/8/tune2fs
https://wiki.archlinux.org/index.php/ext4#Remove_reserved_blocks
performance much except if you run for long periods of time (with lots
of file creates and deletes) while the filesystem is almost full
(i.e., say above 95%), at which point you'll be subject to
fragmentation problems. Ext4's multi-block allocator is much more
fragmentation resistant, because it tries much harder to find
contiguous blocks, so even if you don't enable the other ext4
features, you'll see better results simply mounting an ext3 filesystem
using ext4 before the filesystem gets completely full.
If you are just using the filesystem for long-term archive, where
files aren't changing very often (i.e., a huge mp3 or video store), it
obviously won't matter.
- Ted
Example: Changed reserved-blocks-percentage
[root@mytest01 u01]# df -h /u01Filesystem Size Used Avail Use% Mounted on
/dev/mapper/VolGroup0-U01LV 50G 52M 47G 1% /u01
[root@mytest01 u01]# tune2fs -m 1 /dev/mapper/VolGroup0-U01LV
tune2fs 1.43-WIP (20-Jun-2013)
Setting reserved blocks percentage to 1% (131072 blocks)
[root@mytest01 u01]# df -h /u01
Filesystem Size Used Avail Use% Mounted on
/dev/mapper/VolGroup0-U01LV 50G 52M 49G 1% /u01
[root@mytest01 u01]# tune2fs -m 5 /dev/mapper/VolGroup0-U01LV
tune2fs 1.43-WIP (20-Jun-2013)
Setting reserved blocks percentage to 5% (655360 blocks)
[root@mytest01 u01]# df -h /u01
Filesystem Size Used Avail Use% Mounted on
/dev/mapper/VolGroup0-U01LV 50G 52M 47G 1% /u01Finally, I knew it was reserved for super-user. Checked more for calculation.
[root@ottuatdb01 ~]# df -m /u01
Filesystem 1M-blocks Used Available Use% Mounted on
/dev/mapper/VolGroup0-U01LV 50269 52 47657 1% /u01
[root@ottuatdb01 ~]# tune2fs -l /dev/mapper/VolGroup0-U01LV |egrep 'Block size|Reserved block count'
Reserved block count: 655360
Block size: 4096
Available = 47657MB
Used = 52M
Reserved Space = (655360 x 4096) / 1024 /1024 = 2560MB
Total = 47657 + 2560 + 52 = 50269
OK.. I felt good after it cleared for me. Somehow, I believe On Hug space, 5% of the filesystem blocks reserved that's too much. We can reduce it.
Other Links:
https://www.redhat.com/archives/ext3-users/2009-January/msg00026.html
http://unix.stackexchange.com/questions/7950/reserved-space-for-root-on-a-filesystem-why
http://linux.die.net/man/8/tune2fs
https://wiki.archlinux.org/index.php/ext4#Remove_reserved_blocks
Categories: DBA Blogs
Extend linux partition on vmware
It was a quiet day, I worked as System Administrator and installed Oracle Linux on Virtual Machine guest. After installed Operating System, I wanted to extend disk on guest. So, I extended disk on guest. Anyway, I came back in my head what I was supposed to do on Linux then ?
Finally, I had VolGroup0 with new size, then extended Logical Volume.
- Create new disk (and Physical Volume) and then add in Volume Group.
Checked my partition:
[root@mytest01 ~]# fdisk -l /dev/sda
Disk /dev/sda: 697.9 GB, 697932185600 bytes
255 heads, 63 sectors/track, 84852 cylinders
Units = cylinders of 16065 * 512 = 8225280 bytes
Sector size (logical/physical): 512 bytes / 512 bytes
I/O size (minimum/optimal): 512 bytes / 512 bytes
Disk identifier: 0x00061d87
Device Boot Start End Blocks Id System
/dev/sda1 * 1 131 1048576 83 Linux
Partition 1 does not end on cylinder boundary.
/dev/sda2 131 78326 628096000 8e Linux LVM
[root@mytest01 ~]# pvdisplay
--- Physical volume ---
PV Name /dev/sda2
VG Name VolGroup0
PV Size 599.00 GiB / not usable 3.00 MiB
Allocatable yes (but full)
PE Size 4.00 MiB
Total PE 153343
Free PE 0
Allocated PE 153343
PV UUID AcujnG-5XVc-TWWl-O4Oe-Nv03-rJtc-b5jUlW
I thought I should be able to extend (resize) /dev/sda2 - Found out on the Internet, get some example.
- Extend Physical Volume (Chose this idea)
Started to do it: Idea is Deleting/Recreating/run "pvresize".
Started to do it: Idea is Deleting/Recreating/run "pvresize".
[root@mytest01 ~]# fdisk /dev/sda
WARNING: DOS-compatible mode is deprecated. It's strongly recommended to
switch off the mode (command 'c') and change display units to
sectors (command 'u').
Command (m for help): p
Disk /dev/sda: 697.9 GB, 697932185600 bytes
255 heads, 63 sectors/track, 84852 cylinders
Units = cylinders of 16065 * 512 = 8225280 bytes
Sector size (logical/physical): 512 bytes / 512 bytes
I/O size (minimum/optimal): 512 bytes / 512 bytes
Disk identifier: 0x00061d87
Device Boot Start End Blocks Id System
/dev/sda1 * 1 131 1048576 83 Linux
Partition 1 does not end on cylinder boundary.
/dev/sda2 131 78326 628096000 8e Linux LVM
Command (m for help): d
Partition number (1-4): 2
Command (m for help): p
Disk /dev/sda: 697.9 GB, 697932185600 bytes
255 heads, 63 sectors/track, 84852 cylinders
Units = cylinders of 16065 * 512 = 8225280 bytes
Sector size (logical/physical): 512 bytes / 512 bytes
I/O size (minimum/optimal): 512 bytes / 512 bytes
Disk identifier: 0x00061d87
Device Boot Start End Blocks Id System
/dev/sda1 * 1 131 1048576 83 Linux
Partition 1 does not end on cylinder boundary.
Command (m for help): n
Command action
e extended
p primary partition (1-4)
p
Partition number (1-4): 2
First cylinder (131-84852, default 131):
Using default value 131
Last cylinder, +cylinders or +size{K,M,G} (131-84852, default 84852):
Using default value 84852
Command (m for help): p
Disk /dev/sda: 697.9 GB, 697932185600 bytes
255 heads, 63 sectors/track, 84852 cylinders
Units = cylinders of 16065 * 512 = 8225280 bytes
Sector size (logical/physical): 512 bytes / 512 bytes
I/O size (minimum/optimal): 512 bytes / 512 bytes
Disk identifier: 0x00061d87
Device Boot Start End Blocks Id System
/dev/sda1 * 1 131 1048576 83 Linux
Partition 1 does not end on cylinder boundary.
/dev/sda2 131 84852 680524090 83 Linux
Command (m for help): t
Partition number (1-4): 2
Hex code (type L to list codes): L
0 Empty 24 NEC DOS 81 Minix / old Lin bf Solaris
1 FAT12 39 Plan 9 82 Linux swap / So c1 DRDOS/sec (FAT-
2 XENIX root 3c PartitionMagic 83 Linux c4 DRDOS/sec (FAT-
3 XENIX usr 40 Venix 80286 84 OS/2 hidden C: c6 DRDOS/sec (FAT-
4 FAT16 <32m 85="" boot="" br="" c7="" extended="" inux="" nbsp="" prep="" yrinx=""> 5 Extended 42 SFS 86 NTFS volume set da Non-FS data
6 FAT16 4d QNX4.x 87 NTFS volume set db CP/M / CTOS / .
7 HPFS/NTFS 4e QNX4.x 2nd part 88 Linux plaintext de Dell Utility
8 AIX 4f QNX4.x 3rd part 8e Linux LVM df BootIt
9 AIX bootable 50 OnTrack DM 93 Amoeba e1 DOS access
a OS/2 Boot Manag 51 OnTrack DM6 Aux 94 Amoeba BBT e3 DOS R/O
b W95 FAT32 52 CP/M 9f BSD/OS e4 SpeedStor
c W95 FAT32 (LBA) 53 OnTrack DM6 Aux a0 IBM Thinkpad hi eb BeOS fs
e W95 FAT16 (LBA) 54 OnTrackDM6 a5 FreeBSD ee GPT
f W95 Ext'd (LBA) 55 EZ-Drive a6 OpenBSD ef EFI (FAT-12/16/
10 OPUS 56 Golden Bow a7 NeXTSTEP f0 Linux/PA-RISC b
11 Hidden FAT12 5c Priam Edisk a8 Darwin UFS f1 SpeedStor
12 Compaq diagnost 61 SpeedStor a9 NetBSD f4 SpeedStor
14 Hidden FAT16 <3 63="" ab="" arwin="" boot="" br="" f2="" hurd="" nbsp="" or="" secondary="" sys="">16 Hidden FAT16 64 Novell Netware af HFS / HFS+ fb VMware VMFS
17 Hidden HPFS/NTF 65 Novell Netware b7 BSDI fs fc VMware VMKCORE
18 AST SmartSleep 70 DiskSecure Mult b8 BSDI swap fd Linux raid auto
1b Hidden W95 FAT3 75 PC/IX bb Boot Wizard hid fe LANstep
1c Hidden W95 FAT3 80 Old Minix be Solaris boot ff BBT
1e Hidden W95 FAT1
Hex code (type L to list codes): 8e
Changed system type of partition 2 to 8e (Linux LVM)
Command (m for help): p
Disk /dev/sda: 697.9 GB, 697932185600 bytes
255 heads, 63 sectors/track, 84852 cylinders
Units = cylinders of 16065 * 512 = 8225280 bytes
Sector size (logical/physical): 512 bytes / 512 bytes
I/O size (minimum/optimal): 512 bytes / 512 bytes
Disk identifier: 0x00061d87
Device Boot Start End Blocks Id System
/dev/sda1 * 1 131 1048576 83 Linux
Partition 1 does not end on cylinder boundary.
/dev/sda2 131 84852 680524090 8e Linux LVM
Command (m for help): w
The partition table has been altered!
Calling ioctl() to re-read partition table.
WARNING: Re-reading the partition table failed with error 16: Device or resource busy.
The kernel still uses the old table. The new table will be used at
the next reboot or after you run partprobe(8) or kpartx(8)
Syncing disks. -- I chose to "Reboot" :-) --[root@mytest01 ~]# pvdisplay
--- Physical volume ---
PV Name /dev/sda2
VG Name VolGroup0
PV Size 599.00 GiB / not usable 3.00 MiB
Allocatable yes (but full)
PE Size 4.00 MiB
Total PE 153343
Free PE 0
Allocated PE 153343
PV UUID AcujnG-5XVc-TWWl-O4Oe-Nv03-rJtc-b5jUlW
[root@mytest01 ~]# pvresize /dev/sda2
Physical volume "/dev/sda2" changed
1 physical volume(s) resized / 0 physical volume(s) not resized
[root@mytest01 ~]# pvdisplay
--- Physical volume ---
PV Name /dev/sda2
VG Name VolGroup0
PV Size 599.00 GiB / not usable 2.00 MiB
Allocatable yes (but full)
PE Size 4.00 MiB
Total PE 153343
Free PE 0
Allocated PE 153343
PV UUID AcujnG-5XVc-TWWl-O4Oe-Nv03-rJtc-b5jUlW
[root@mytest01 ~]#
[root@mytest01 ~]# reboot
.
.
.
[root@mytest01 ~]# pvdisplay
--- Physical volume ---
PV Name /dev/sda2
VG Name VolGroup0
PV Size 599.00 GiB / not usable 2.00 MiB
Allocatable yes (but full)
PE Size 4.00 MiB
Total PE 153343
Free PE 0
Allocated PE 153343
PV UUID AcujnG-5XVc-TWWl-O4Oe-Nv03-rJtc-b5jUlW
[root@mytest01 ~]# pvresize /dev/sda2
Physical volume "/dev/sda2" changed
1 physical volume(s) resized / 0 physical volume(s) not resized
[root@mytest01 ~]# pvdisplay
--- Physical volume ---
PV Name /dev/sda2
VG Name VolGroup0
PV Size 649.00 GiB / not usable 1.31 MiB
Allocatable yes
PE Size 4.00 MiB
Total PE 166143
Free PE 12800
Allocated PE 153343
PV UUID AcujnG-5XVc-TWWl-O4Oe-Nv03-rJtc-b5jUlW
Note: This case I had 2 partitions (/dev/sda1, /dev/sda2). So, it was a good idea extending Physical Disk. However, I thought creating physical volume and adding in Volume Group, that might be safer.
Finally, I had VolGroup0 with new size, then extended Logical Volume.
[root@mytest01 ~]# df -h /u02
Filesystem Size Used Avail Use% Mounted on
/dev/mapper/VolGroup0-U02LV 460G 70M 437G 1% /u02
[root@mytest01 ~]# lvdisplay /dev/mapper/VolGroup0-U02LV
--- Logical volume ---
LV Path /dev/VolGroup0/U02LV
LV Name U02LV
VG Name VolGroup0
LV UUID 8Gdt6C-ZXQe-dPYi-21yj-Fs0i-6uvE-vzrCbc
LV Write Access read/write
LV Creation host, time mytest01.pythian.com, 2014-09-21 16:43:50 -0400
LV Status available
# open 1
LV Size 467.00 GiB
Current LE 119551
Segments 1
Allocation inherit
Read ahead sectors auto
- currently set to 256
Block device 252:2
[root@mytest01 ~]#
[root@mytest01 ~]# vgdisplay
--- Volume group ---
VG Name VolGroup0
System ID
Format lvm2
Metadata Areas 1
Metadata Sequence No 7
VG Access read/write
VG Status resizable
MAX LV 0
Cur LV 4
Open LV 3
Max PV 0
Cur PV 1
Act PV 1
VG Size 649.00 GiB
PE Size 4.00 MiB
Total PE 166143
Alloc PE / Size 153343 / 599.00 GiB
Free PE / Size 12800 / 50.00 GiB
VG UUID thGxdJ-pCi2-18S0-mrZc-cCJM-2SH2-JRpfQ5
[root@mytest01 ~]#
[root@mytest01 ~]# -- Should use "e2fsck" in case resize (shrink). This case no need.
[root@mytest01 ~]# e2fsck -f /dev/mapper/VolGroup0-U02LV
e2fsck 1.43-WIP (20-Jun-2013)
Pass 1: Checking inodes, blocks, and sizes
Pass 2: Checking directory structure
Pass 3: Checking directory connectivity
Pass 4: Checking reference counts
Pass 5: Checking group summary information
/dev/mapper/VolGroup0-U02LV: 11/30605312 files (0.0% non-contiguous), 1971528/122420224 blocks
[root@mytest01 ~]#
[root@mytest01 ~]# pvscan
PV /dev/sda2 VG VolGroup0 lvm2 [649.00 GiB / 50.00 GiB free]
Total: 1 [649.00 GiB] / in use: 1 [649.00 GiB] / in no VG: 0 [0 ]
[root@mytest01 ~]#
[root@mytest01 ~]#
[root@mytest01 ~]# lvextend -L +50G /dev/mapper/VolGroup0-U02LV
Extending logical volume U02LV to 517.00 GiB
Logical volume U02LV successfully resized
[root@mytest01 ~]#
[root@mytest01 ~]# resize2fs /dev/mapper/VolGroup0-U02LV
resize2fs 1.43-WIP (20-Jun-2013)
Resizing the filesystem on /dev/mapper/VolGroup0-U02LV to 135527424 (4k) blocks.
The filesystem on /dev/mapper/VolGroup0-U02LV is now 135527424 blocks long.
[root@mytest01 ~]#
[root@mytest01 ~]#
[root@mytest01 ~]# lvdisplay /dev/mapper/VolGroup0-U02LV
--- Logical volume ---
LV Path /dev/VolGroup0/U02LV
LV Name U02LV
VG Name VolGroup0
LV UUID 8Gdt6C-ZXQe-dPYi-21yj-Fs0i-6uvE-vzrCbc
LV Write Access read/write
LV Creation host, time mytest01.pythian.com, 2014-09-21 16:43:50 -0400
LV Status available
# open 0
LV Size 517.00 GiB
Current LE 132351
Segments 2
Allocation inherit
Read ahead sectors auto
- currently set to 256
Block device 252:2
[root@mytest01 ~]#
[root@mytest01 ~]# df -h /u02
Filesystem Size Used Avail Use% Mounted on
/dev/mapper/VolGroup0-U02LV 509G 70M 483G 1% /u02
Filesystem Size Used Avail Use% Mounted on
/dev/mapper/VolGroup0-U02LV 460G 70M 437G 1% /u02
[root@mytest01 ~]# lvdisplay /dev/mapper/VolGroup0-U02LV
--- Logical volume ---
LV Path /dev/VolGroup0/U02LV
LV Name U02LV
VG Name VolGroup0
LV UUID 8Gdt6C-ZXQe-dPYi-21yj-Fs0i-6uvE-vzrCbc
LV Write Access read/write
LV Creation host, time mytest01.pythian.com, 2014-09-21 16:43:50 -0400
LV Status available
# open 1
LV Size 467.00 GiB
Current LE 119551
Segments 1
Allocation inherit
Read ahead sectors auto
- currently set to 256
Block device 252:2
[root@mytest01 ~]#
[root@mytest01 ~]# vgdisplay
--- Volume group ---
VG Name VolGroup0
System ID
Format lvm2
Metadata Areas 1
Metadata Sequence No 7
VG Access read/write
VG Status resizable
MAX LV 0
Cur LV 4
Open LV 3
Max PV 0
Cur PV 1
Act PV 1
VG Size 649.00 GiB
PE Size 4.00 MiB
Total PE 166143
Alloc PE / Size 153343 / 599.00 GiB
Free PE / Size 12800 / 50.00 GiB
VG UUID thGxdJ-pCi2-18S0-mrZc-cCJM-2SH2-JRpfQ5
[root@mytest01 ~]#
[root@mytest01 ~]# -- Should use "e2fsck" in case resize (shrink). This case no need.
[root@mytest01 ~]# e2fsck -f /dev/mapper/VolGroup0-U02LV
e2fsck 1.43-WIP (20-Jun-2013)
Pass 1: Checking inodes, blocks, and sizes
Pass 2: Checking directory structure
Pass 3: Checking directory connectivity
Pass 4: Checking reference counts
Pass 5: Checking group summary information
/dev/mapper/VolGroup0-U02LV: 11/30605312 files (0.0% non-contiguous), 1971528/122420224 blocks
[root@mytest01 ~]#
[root@mytest01 ~]# pvscan
PV /dev/sda2 VG VolGroup0 lvm2 [649.00 GiB / 50.00 GiB free]
Total: 1 [649.00 GiB] / in use: 1 [649.00 GiB] / in no VG: 0 [0 ]
[root@mytest01 ~]#
[root@mytest01 ~]#
[root@mytest01 ~]# lvextend -L +50G /dev/mapper/VolGroup0-U02LV
Extending logical volume U02LV to 517.00 GiB
Logical volume U02LV successfully resized
[root@mytest01 ~]#
[root@mytest01 ~]# resize2fs /dev/mapper/VolGroup0-U02LV
resize2fs 1.43-WIP (20-Jun-2013)
Resizing the filesystem on /dev/mapper/VolGroup0-U02LV to 135527424 (4k) blocks.
The filesystem on /dev/mapper/VolGroup0-U02LV is now 135527424 blocks long.
[root@mytest01 ~]#
[root@mytest01 ~]#
[root@mytest01 ~]# lvdisplay /dev/mapper/VolGroup0-U02LV
--- Logical volume ---
LV Path /dev/VolGroup0/U02LV
LV Name U02LV
VG Name VolGroup0
LV UUID 8Gdt6C-ZXQe-dPYi-21yj-Fs0i-6uvE-vzrCbc
LV Write Access read/write
LV Creation host, time mytest01.pythian.com, 2014-09-21 16:43:50 -0400
LV Status available
# open 0
LV Size 517.00 GiB
Current LE 132351
Segments 2
Allocation inherit
Read ahead sectors auto
- currently set to 256
Block device 252:2
[root@mytest01 ~]#
[root@mytest01 ~]# df -h /u02
Filesystem Size Used Avail Use% Mounted on
/dev/mapper/VolGroup0-U02LV 509G 70M 483G 1% /u02
Note: resize2fs can use online, If the filesystem is mounted, it can be used to expand the size of the mounted filesystem, assuming the kernel supports on-line resizing. (As of this writing, the Linux 2.6 kernel supports on-line resize for filesystems mounted using ext3 and ext4.).
Look like today, I learned too much about linux partitioning.
Categories: DBA Blogs